A common question we hear from users is, “What makes OptiMonk 3.0 better than a simple popup tool?”
In this article, we’ll answer that question by describing the specific capabilities that OptiMonk puts at store owners’ fingertips. Features like our advanced targeting system, embedded content, and other personalization options make OptiMonk 3.0 an advanced ecommerce personalization platform.
Let’s look at OptiMonk’s vast array of industry-leading use cases!
Shortcuts ✂️
- Collect more data from new visitors and boost conversions
- Personalize your campaigns based on country
- Display personalized offers based on traffic source
- Raise awareness about your best-selling products
- Increase average order value with free shipping bars
- Use automatically-generated coupon codes
- Remind your visitors to use their coupon codes
- Promote post-purchase offers
- Ask your visitors why they’re leaving
- Test different value propositions on product pages
- Ask for custom data for more personalized email campaigns
- Gamify your popups
1. Collect more data from new visitors and boost conversions
Sites with huge inventories of products can use a Conversational Popup to help visitors find what they’re looking for more quickly and easily. This avoids the “Paradox of Choice,” which happens when visitors have too many options to choose from.
It works like this: when a visitor lands on your site, they might start feeling overwhelmed by the number of products and options. Just then, a welcome popup appears and asks visitors what types of products they’re interested in.
Phew! They’re relieved.
Their choice takes them to a second page of the same popup, which shows product recommendations based on their selection. They can now choose between the 3 most popular products in that category.
And you can also give them the option to get a discount in exchange for joining your email list.
How to set it up:
Pick a template from our Template Library and customize it to match the look and feel of your website. You can also change the question’s wording and the answer options according to your needs.
Next, you’ll need to choose the products that get recommended based on each answer. That’ll require you to duplicate the second and the third page of the popup based on the number of possible answers.
For example: if you’re offering 3 potential answers to your question, then you’ll need to create 3 copies of the second and the third page.
For a more detailed set-up guide, click here.
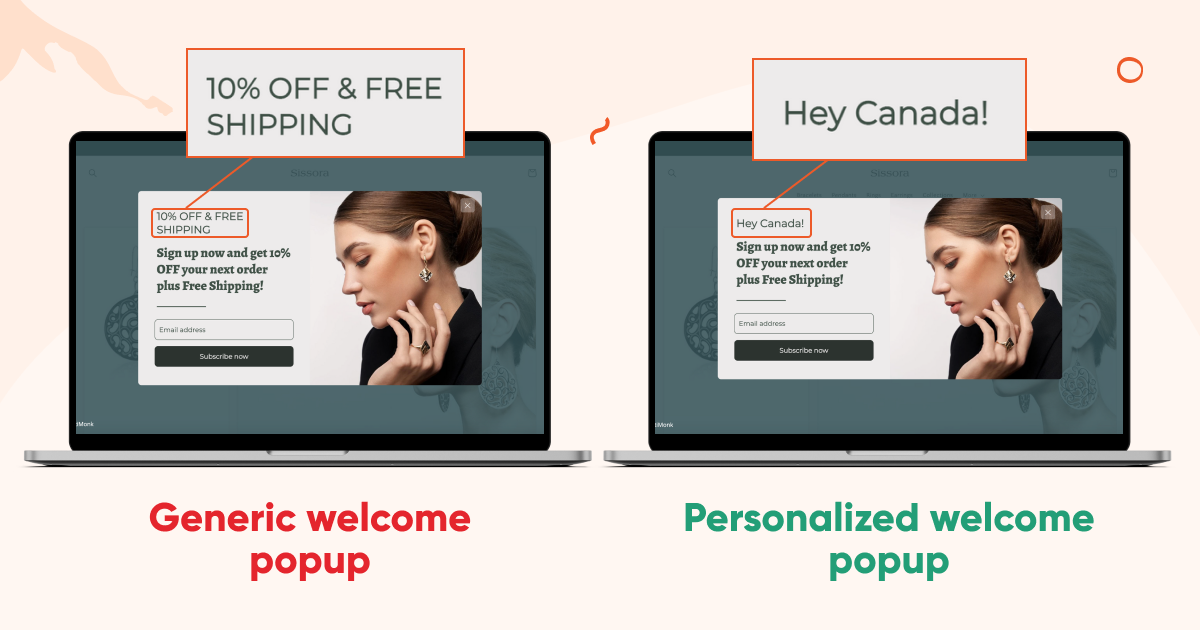
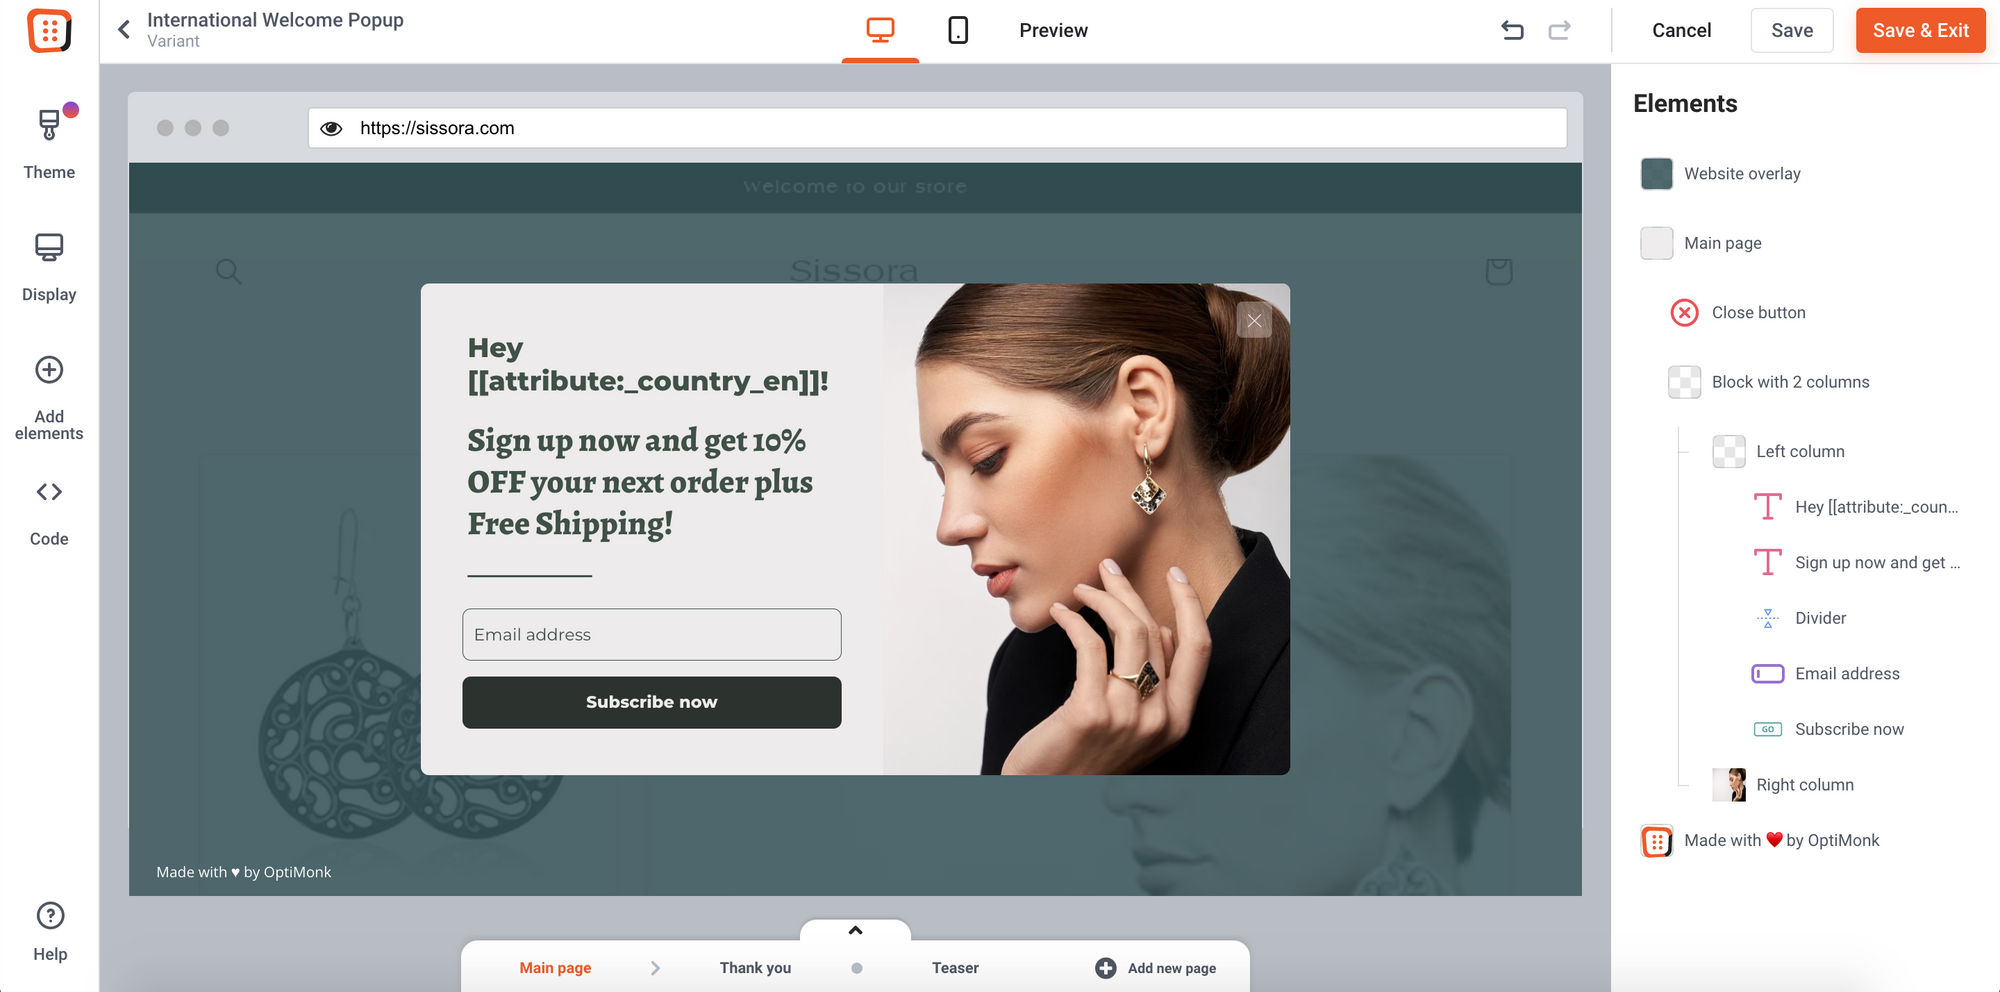
2. Personalize your campaigns based on country
If your store has a considerable amount of international traffic, you should personalize your welcome message based on the visitor’s country to make them even more powerful.
This strategy could increase your conversion rate by at least 20%.
How to set it up:
It’s easy! Use our Smart Tags feature and insert the [[attribute:_country_en]] property wherever you want the name of the country to appear:
3. Display personalized offers based on traffic source
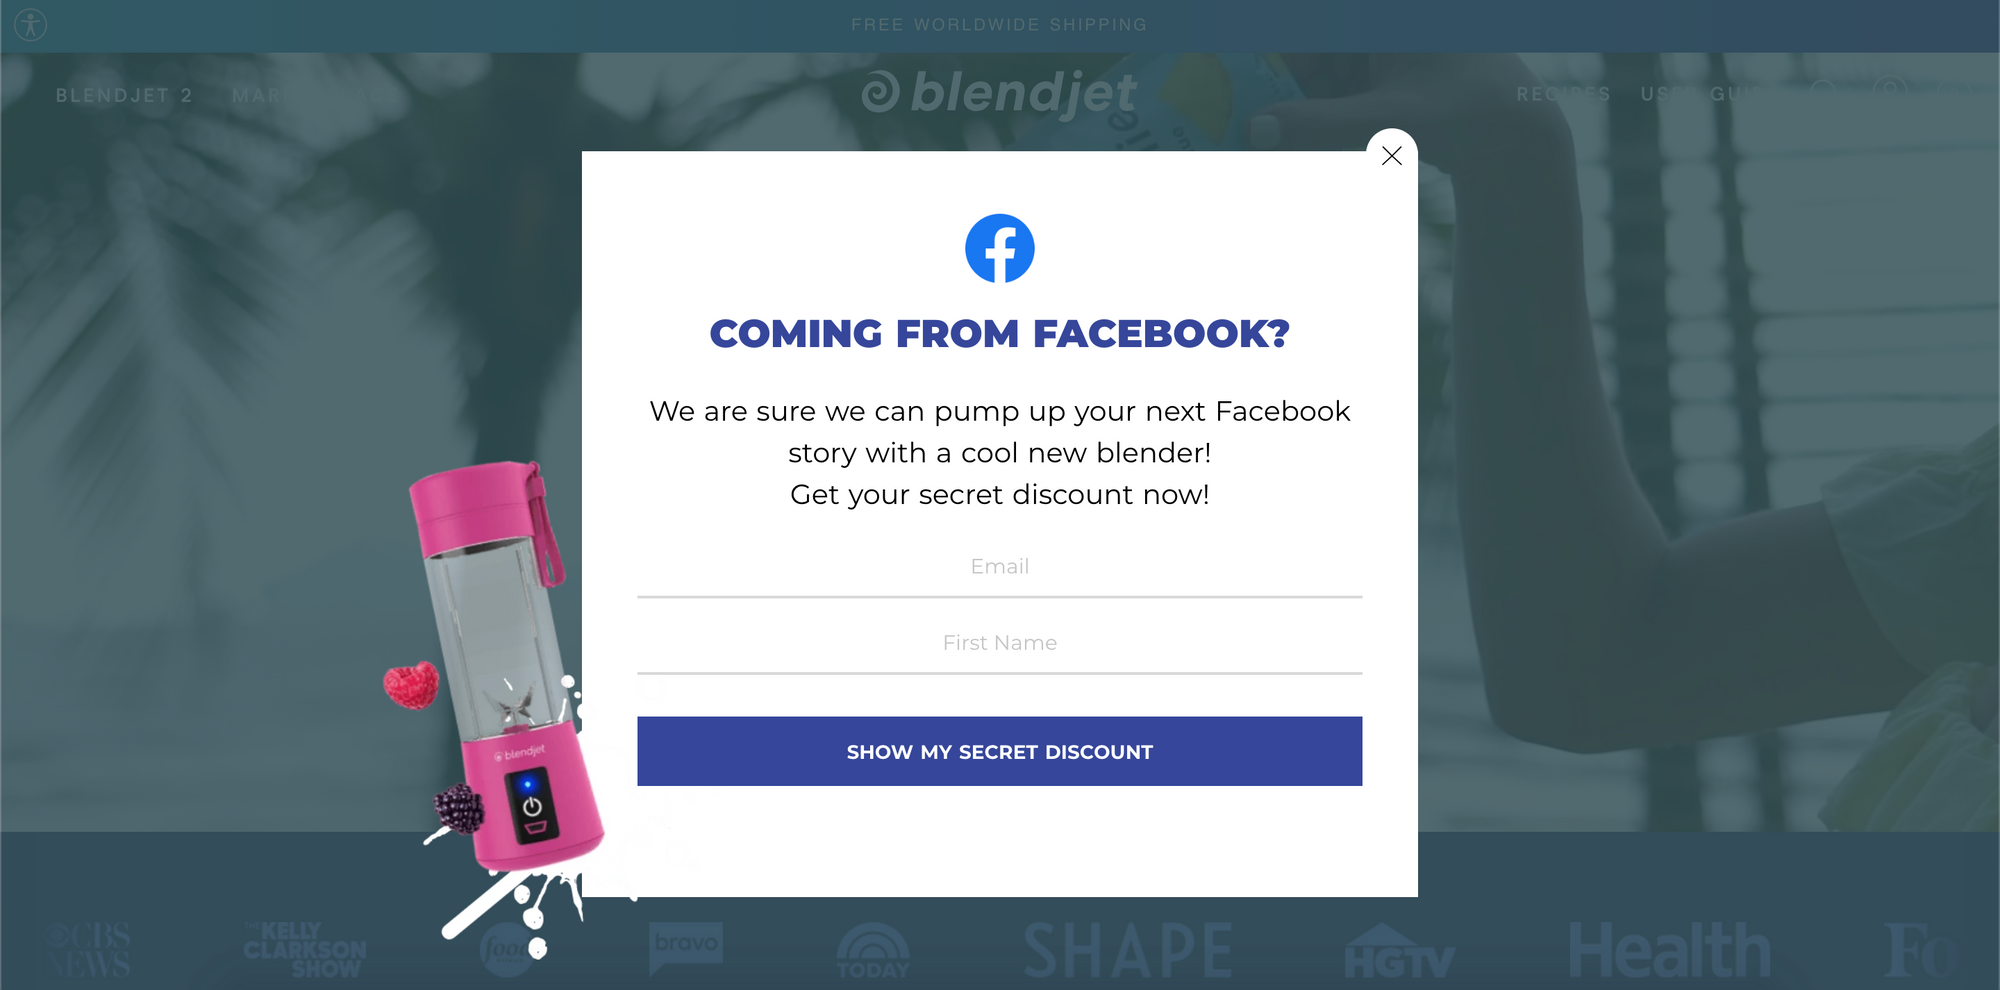
Source-based targeting allows you to communicate different messages to visitors arriving from different channels. Since lots of incoming traffic comes from paid ads, you don’t want to waste those expensive leads.
With OptiMonk, you can create messages that are tailored to traffic coming from different sources. For example, you might want to use a personalized message for visitors coming from Facebook:
And visitors coming from Instagram:
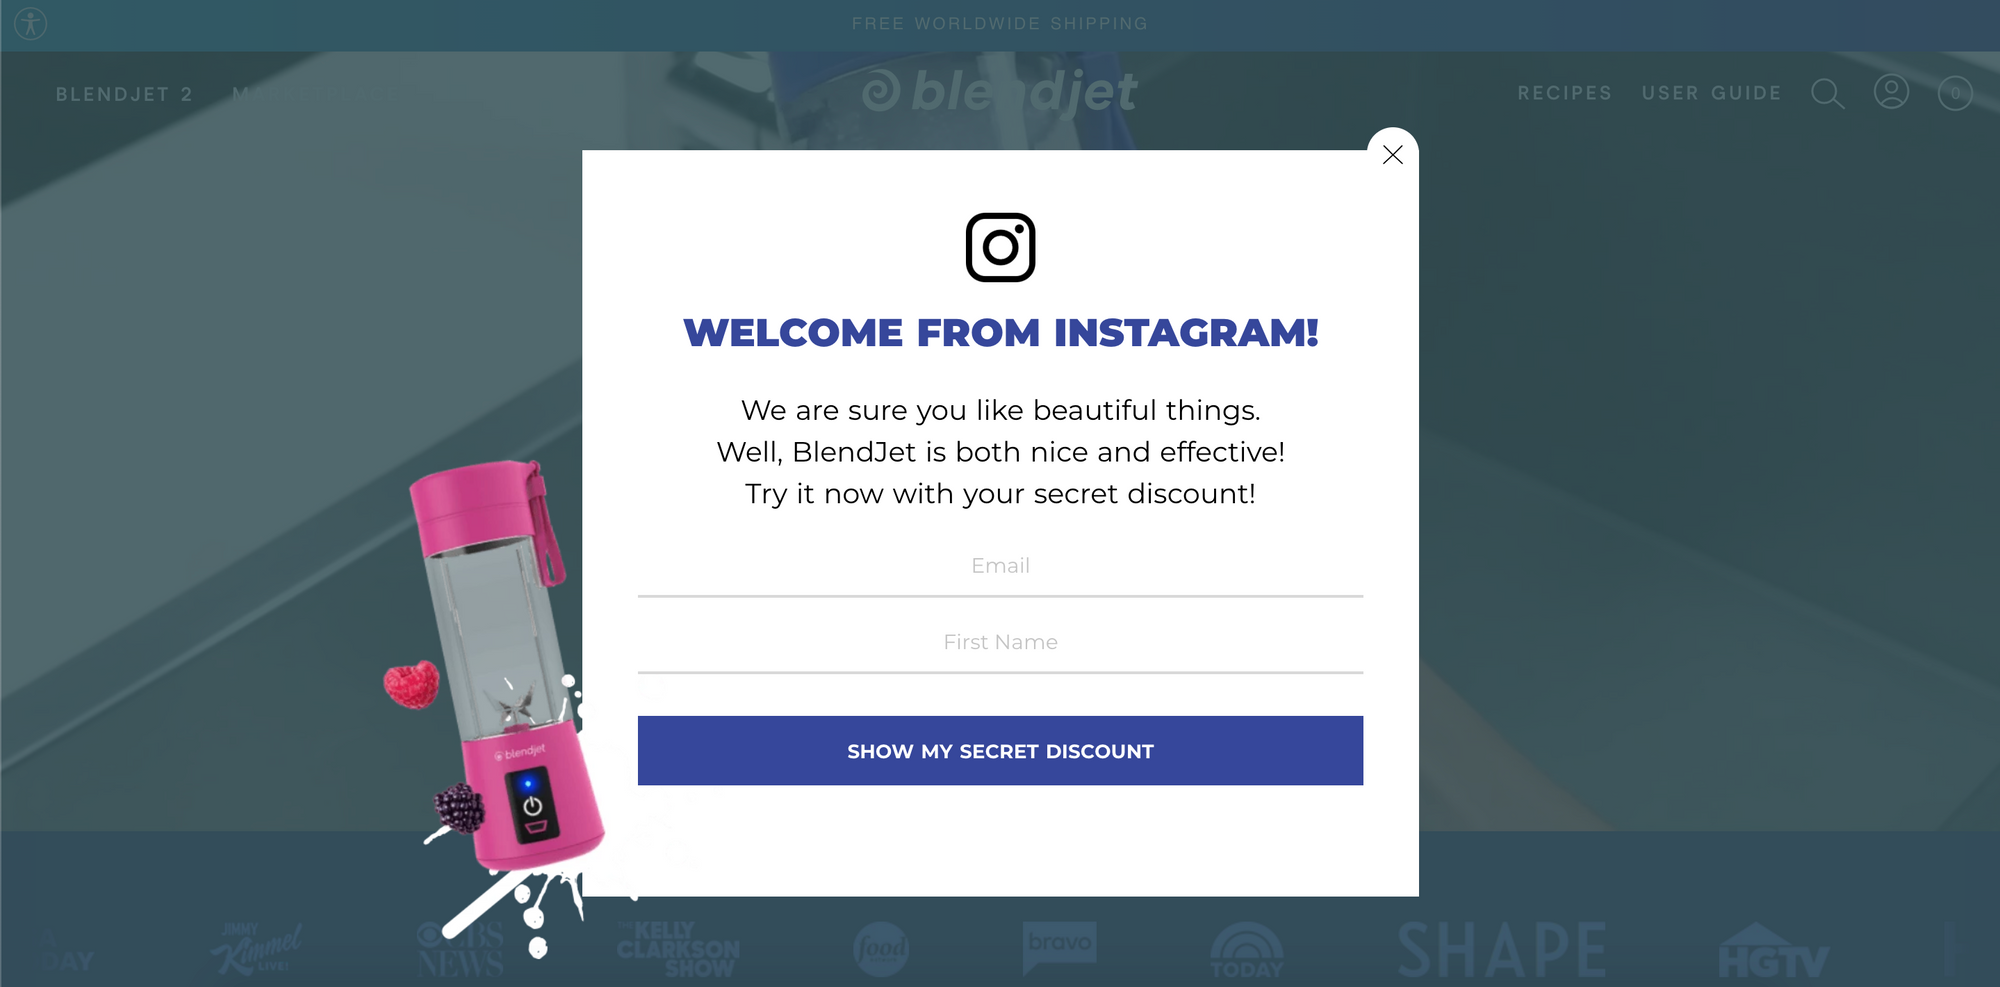
If you personalize your opt-in message and display the traffic source, you can increase the conversion rate of your campaign by 50%.
How to set it up:
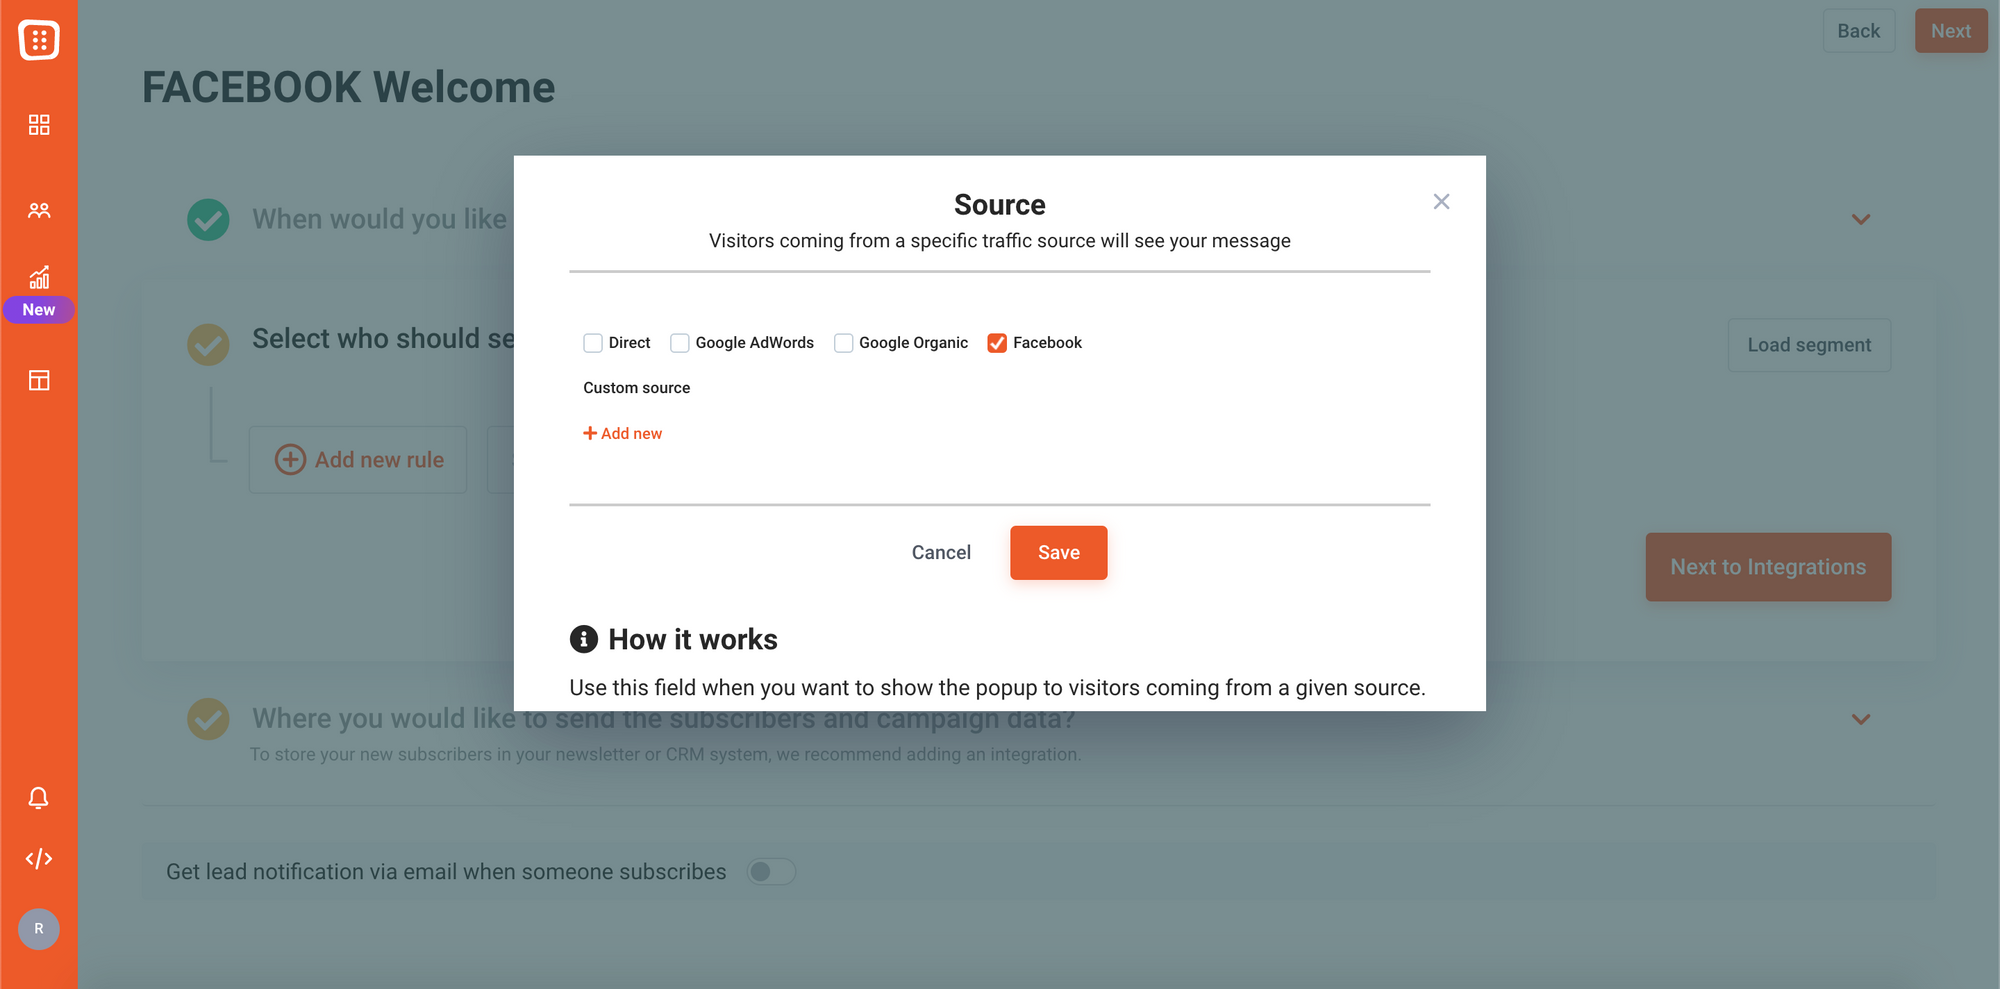
Under the “Who to Show” menu, you’ll need to click on the “Add new condition” button and choose “Source.” There, you can use the presets that cover common traffic sources or provide your own unique URLs to include or exclude.
4. Raise awareness about your best-selling products
Another approach to combating the Paradox of Choice is to use popups that display your best-selling products.
You can display messages based on the category your visitor is currently browsing. So instead of having to choose between, say, seven slightly-different trampolines, they can just go with the one that most people are buying.
You can also call them “Popular Products,” “Customer Favorites,” or “Best Sellers.” This is a sure-fire way to entice consumers who always want to get their hands on the best, most popular products.
Here are a few examples of how you can help your visitors find what they need:
How to set it up:
First off, choose one of the Product Recommender Popup templates and personalize it with relevant, compelling copy and an enticing CTA.
Next, you’ll have to choose the settings for your product recommendation element from three options:
- Manual: You choose which products are recommended.
- Recently viewed: Items whose product pages visitors recently viewed appear as recommendations.
- Most popular: The most popular items are recommended, but you have three further options here. You can display the most popular items of (1) the whole store, (2) a specific category you choose, or (3) the specific category that your customer is browsing.
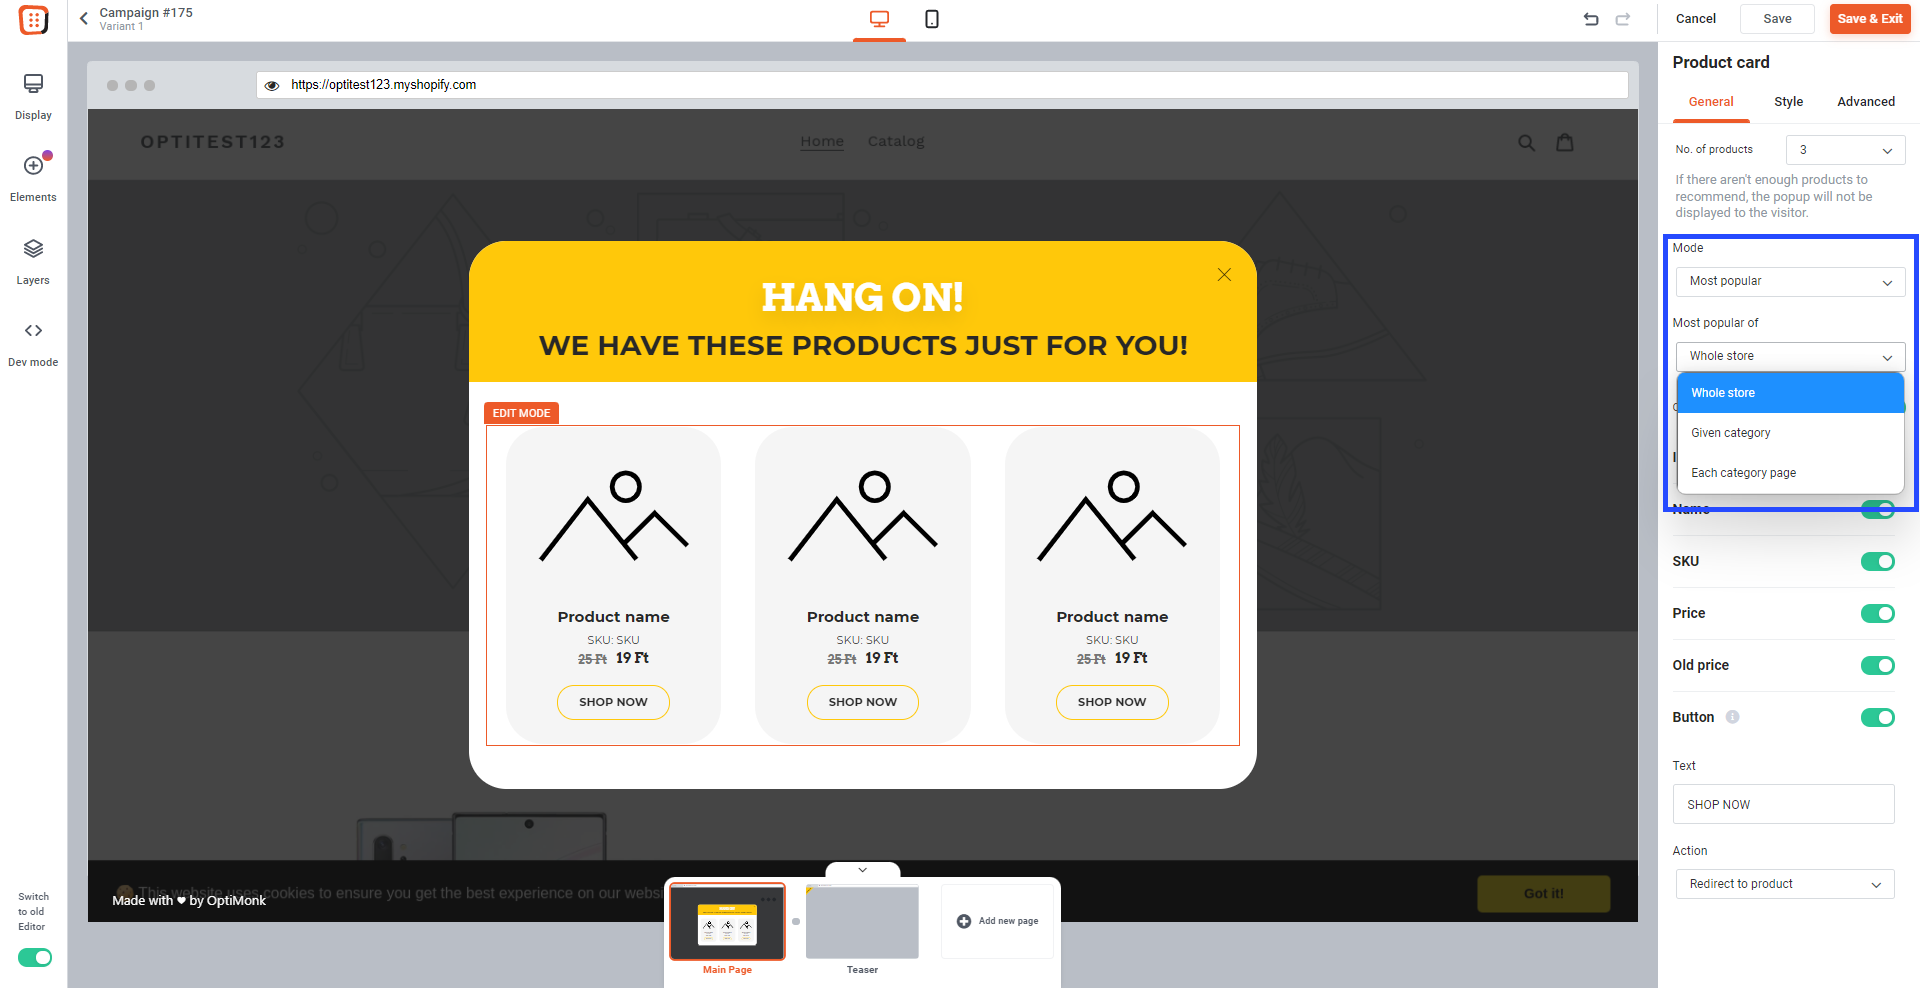
You should choose the option that makes the most sense for you: are you trying to move products from a particular category or are you more interested in helping people find the best options in the category they’re currently looking at? The answer to that question (and many related ones) depends on the specifics of your ecommerce store.
5. Increase average order value with free shipping bars
As an ecommerce site owner, you’re probably already watching your average order value (AOV) closely and looking for ways to maximize it. Our Free Shipping Bars are a great way to get people to make more (and bigger) purchases.
Showing visitors your store’s free shipping threshold is one of the easiest ways to boost your AOV. Customers love nothing more than free shipping, and they’ll often look for more items to buy just to reach the amount needed to qualify for it.
Sticky bars are the best way to remind your customers about your free shipping threshold since they’re constantly on the screen but don’t interfere with the flow of shopping.
Here’s an example of a Free Shipping Bar:
How to set it up:
You have two options. You could set up a simple Free Shipping Bar like the one above to display your free shipping threshold. Just choose a template and put in your shipping info.
Or you can create a Dynamic Free Shipping Bar, which updates to show exactly how much more someone needs to spend to get free shipping.
For example, if your threshold is $75 for free shipping, a customer with items worth $50 in their cart will see a message that reads something like “Only $25 away from free shipping,” like in the example below.

To set up a Dynamic Free Shipping Bar, choose one of these templates and use the placeholder text from the image below:

Then replace the “X” with the value of your free shipping threshold (so that the sticky bar knows how much to count down from).
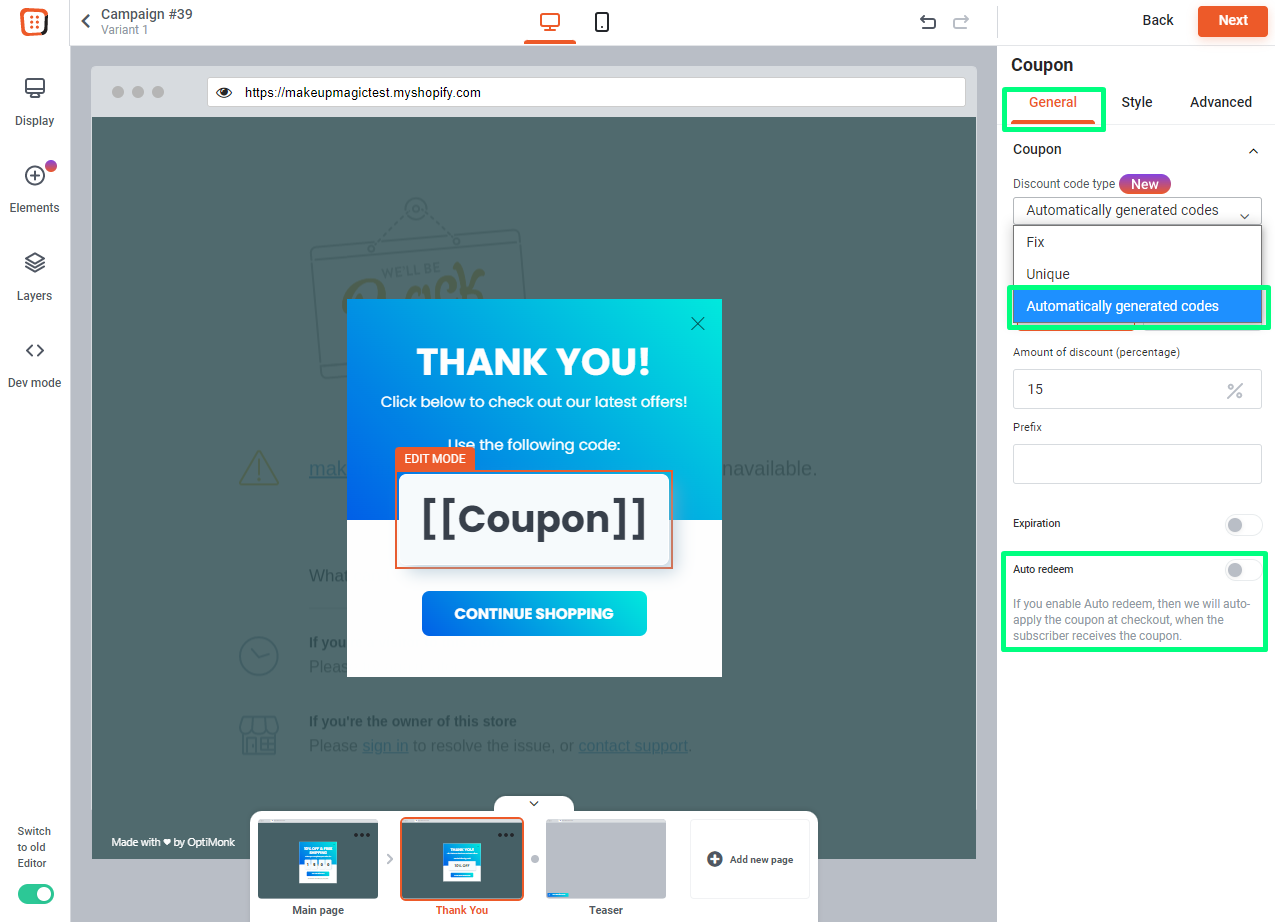
6. Use automatically-generated coupon codes
OptiMonk can automatically create unique coupon codes for each customer. This makes tracking the successes and failures of your campaigns easier, since you’ll know whether or not each customer has used their unique code.
Our data shows that unique, randomized coupon codes—something like “GH66Y8”—convert much better than generic codes like “10OFF.”
This is because randomized discount codes seem more temporary and easier to lose than a generic code, adding a sense of urgency to the coupon code itself. In contrast, it seems like you’ll still be able to use a code like “10OFF” next week or month.
With this option, you can create different sets of coupon codes for different campaigns. When a visitor requests a code, it will be 100% unique, so no one else will ever see the same code.
The best thing? All of this is contained in an element that’s easy to add to your popups in our drag & drop editor.
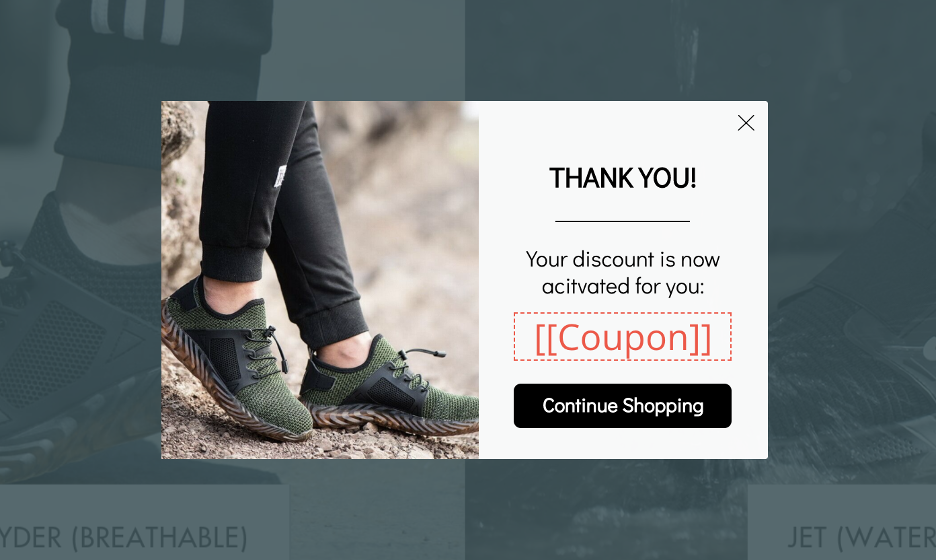
Here’s what it would look like in action:
How to set it up:
Once you’ve selected the template you want to use, drag the coupon element onto your popup. Choose the “Automatically generated codes” option (only available for Shopify stores) to generate and manage your discount codes in OptiMonk. We’ll automatically add them to your Shopify store.
This will generate a unique coupon code for every visitor that interacts with your campaign.
7. Remind your visitors to use their coupon codes
Price-sensitive visitors are not always easy to convince, but coupon codes go a long way toward fighting their resistance.
However, a problem emerges when visitors have a code (whether for a seasonal sale or from signing up for an email list), but forget about it while browsing your site!
Thankfully, it’s an easy problem to solve. You can use an ever-present sticky bar to remind them about their discount.
By using follow-up sticky bars to remind your users about their coupon codes, you can increase the coupon redemption rate by 50%.
First comes the popup with the offer of a discount for subscribing to the email list.
Then, right after they subscribe, a sticky bar like the one below will stay at the top of the site.

How to set it up:
Get started with one of these templates:
If you have a Shopify store, simply choose “Reminder” from the dropdown menu. This way, the sticky bar will display the coupon code that the visitor received previously.
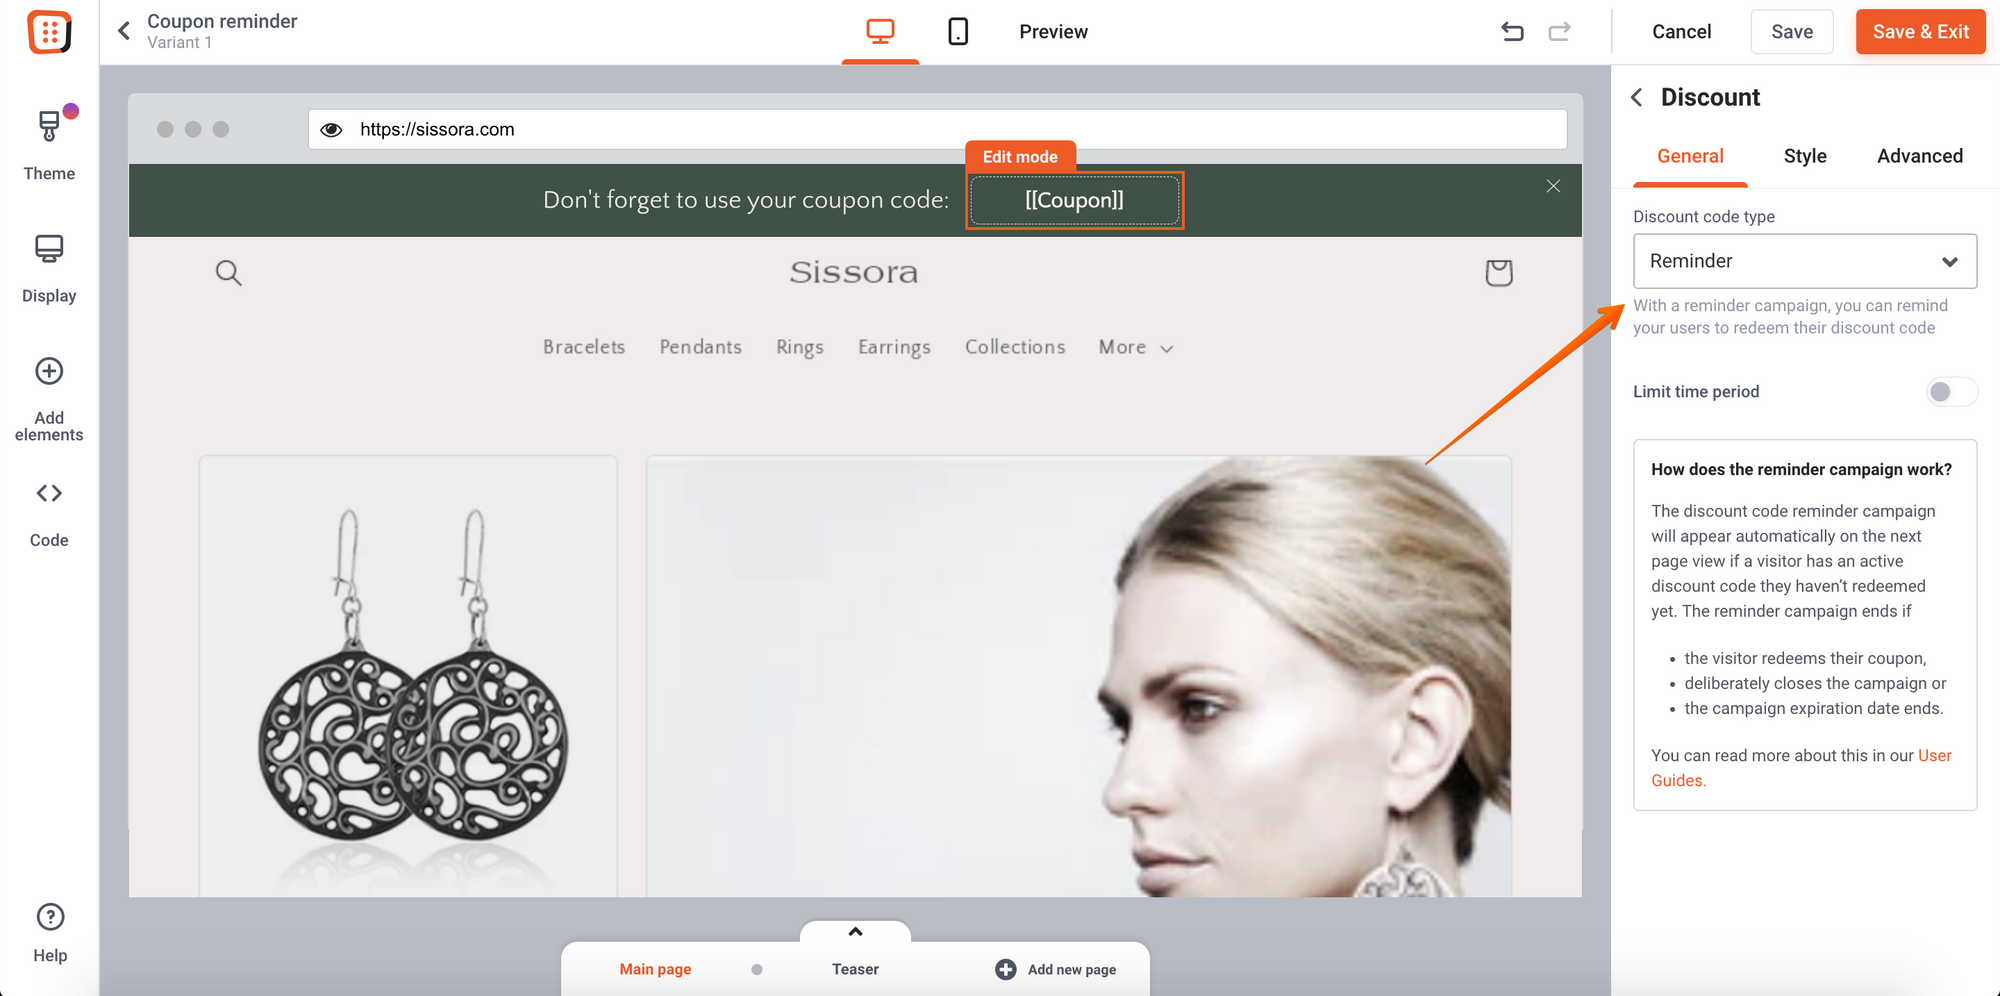
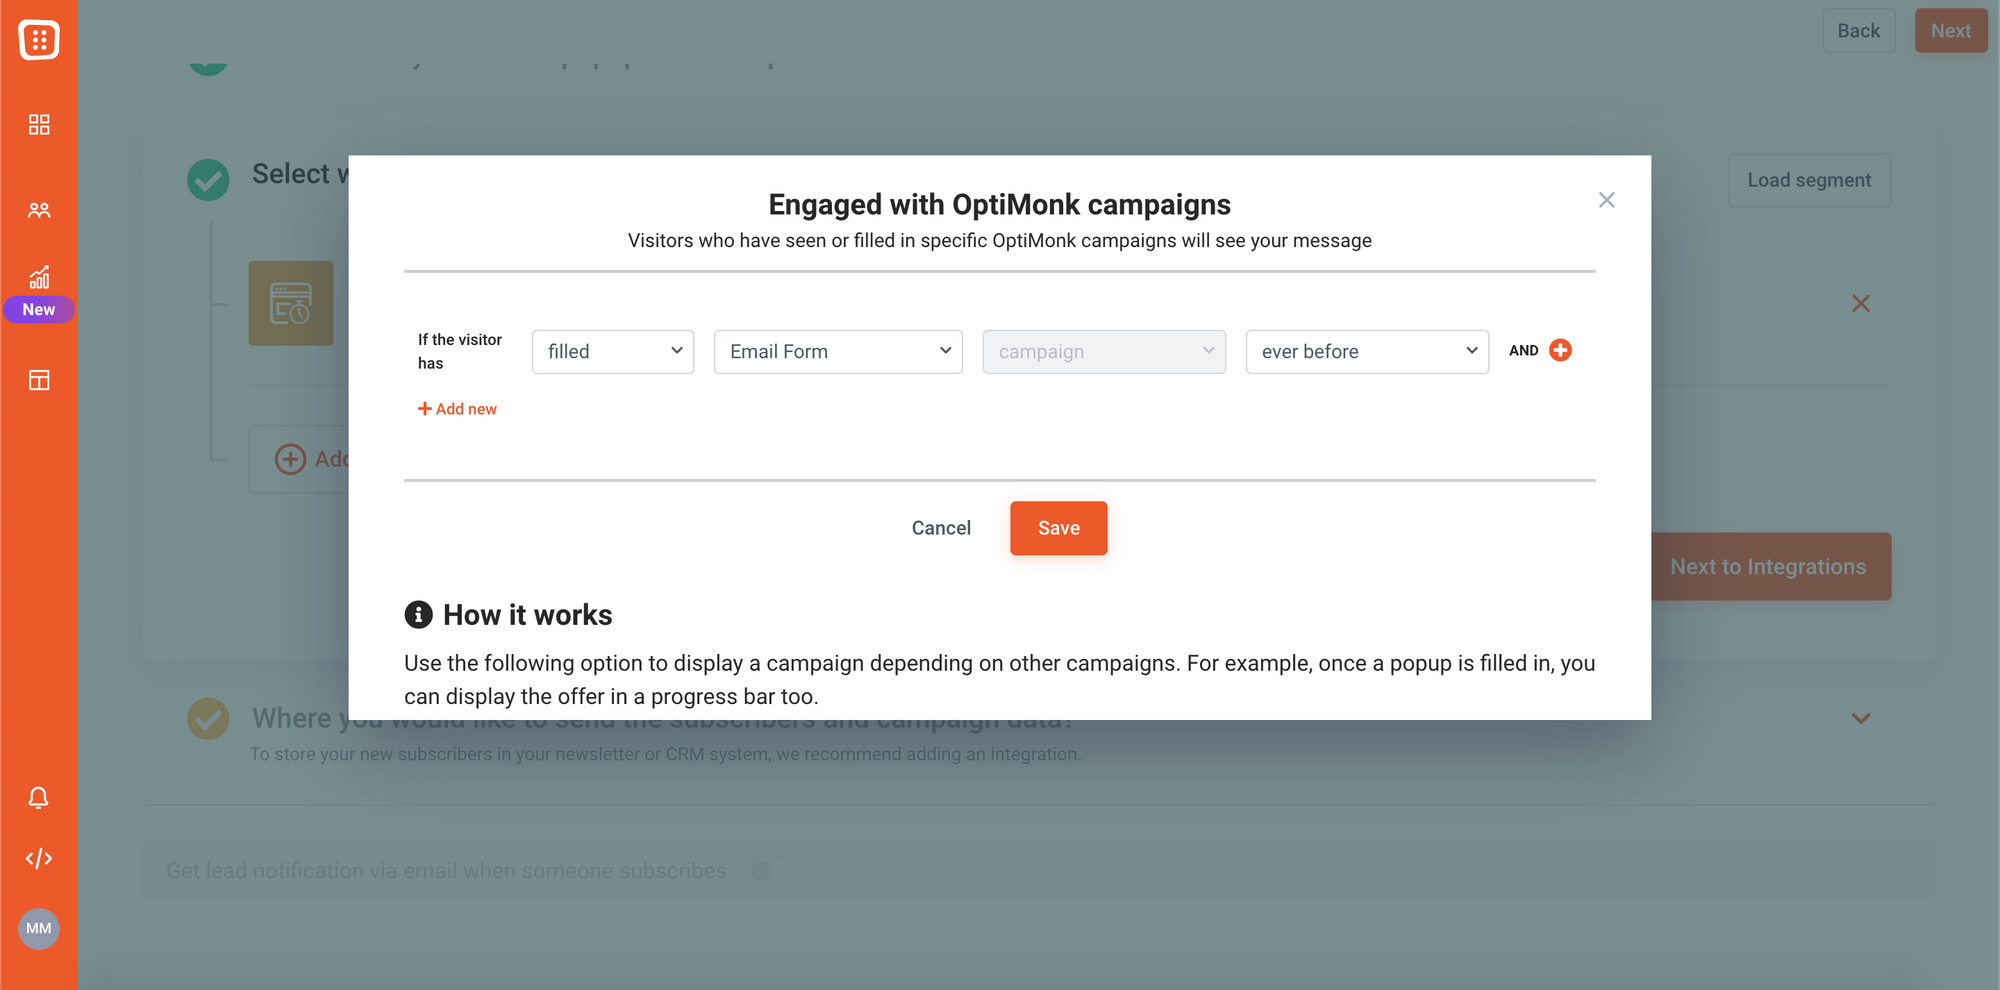
If you don’t have a Shopify store, simply choose “Fixed code” and type in the coupon code that you want to remind visitors to use:
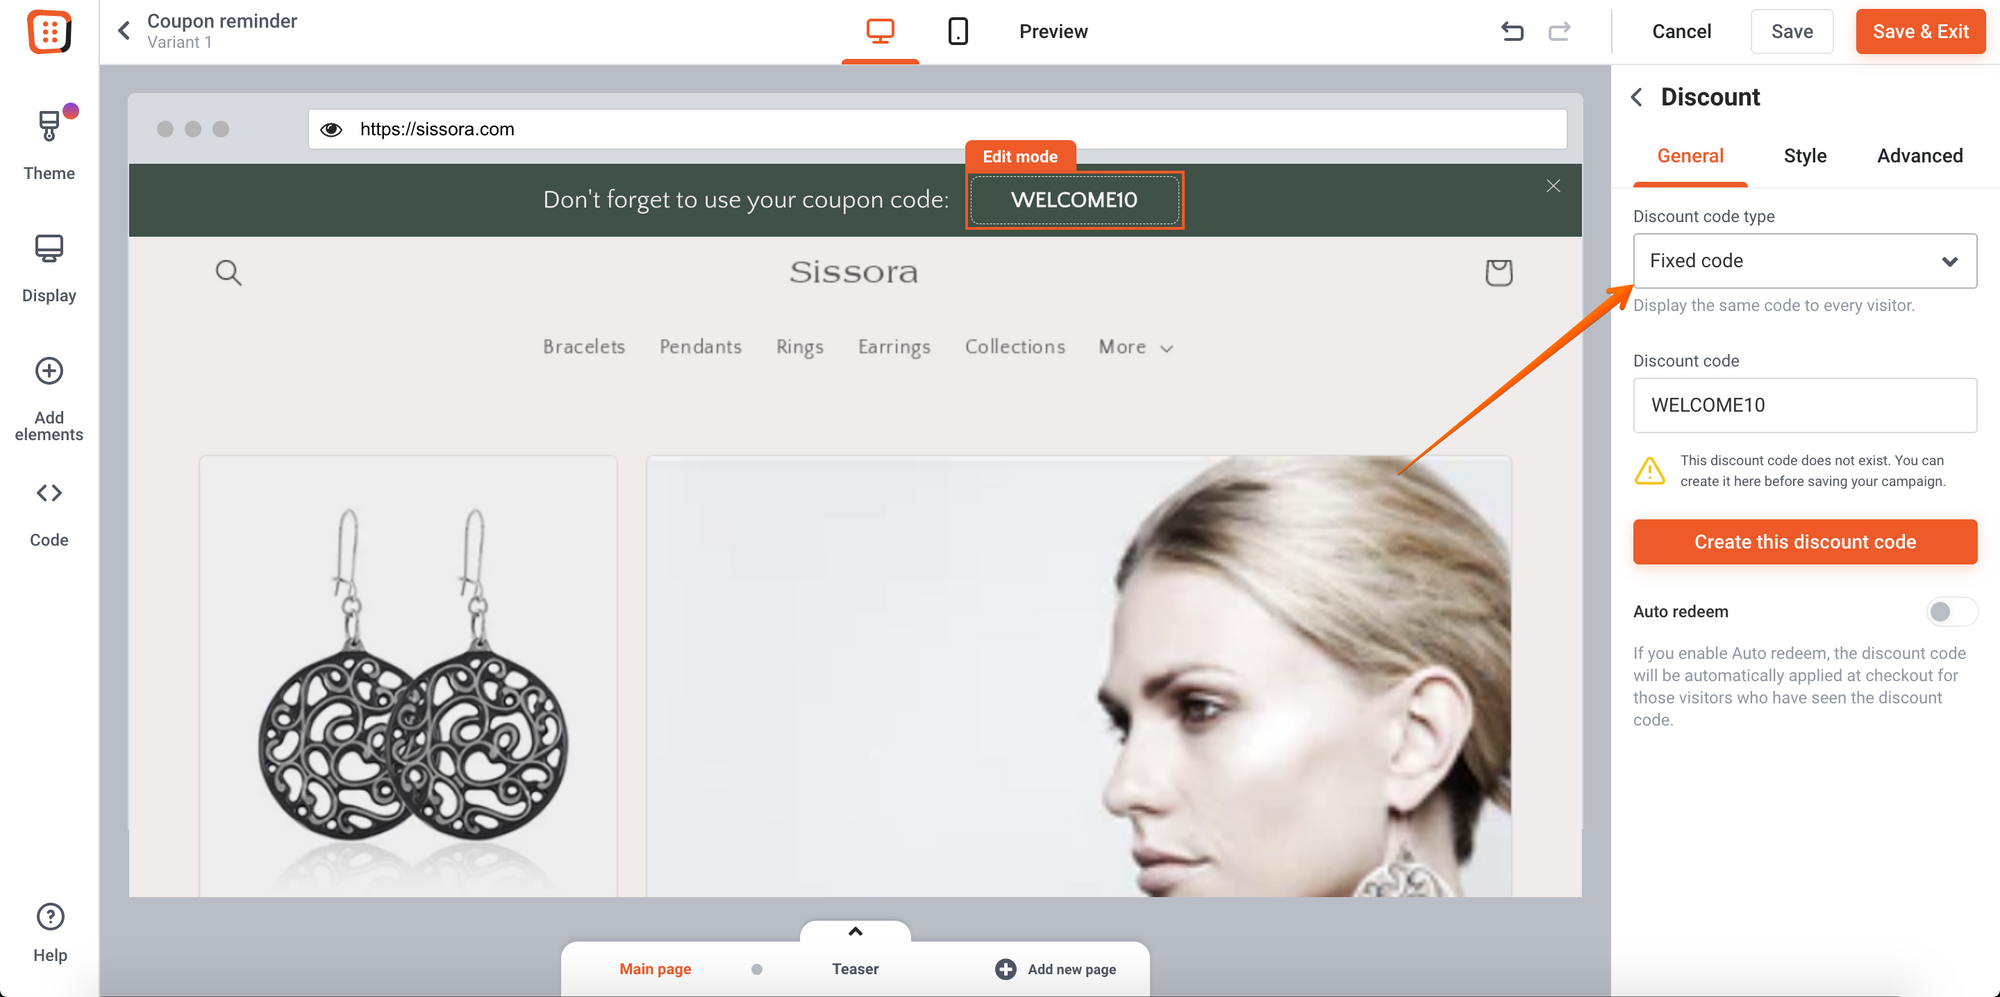
Then, connect your sticky bar with the campaign where the coupon code was first distributed.
You can easily do this with campaign linking. In the “Who to Show” settings, choose the “Engaged with OptiMonk campaigns” option, and then choose the coupon code campaign and the condition “filled”.
8. Promote post-purchase offers
Post-purchase offers help you transform one-time buyers into repeat customers.
Returning customers are essential for an ecommerce store’s bottom line, as they spend roughly 3x more than one-time buyers. It’s also much cheaper to successfully (re)market to existing customers compared to the expense of constantly finding new customers.
The moment after a purchase is the perfect opportunity to offer customers a discount on their next one. They’re in a good emotional state to receive a coupon code, deliver feedback, or sign up for your email list.
Here’s how that could look like:
How to set it up:
You can start by using one of our Repeat Purchase Discount Survey templates. Make sure to set it up so that it only gets triggered on your post-purchase thank you page.
9. Ask your visitors why they’re leaving
98% of visitors abandon ecommerce sites without buying anything and without subscribing to a list. That’s…almost everyone.
With an exit-intent popup, you can ask people why they’re leaving just before they do.
Use an Exit Feedback Survey and set a few answers which are common among visitors on their way out. This will give you invaluable information about how to improve your site.
Here’s an example:
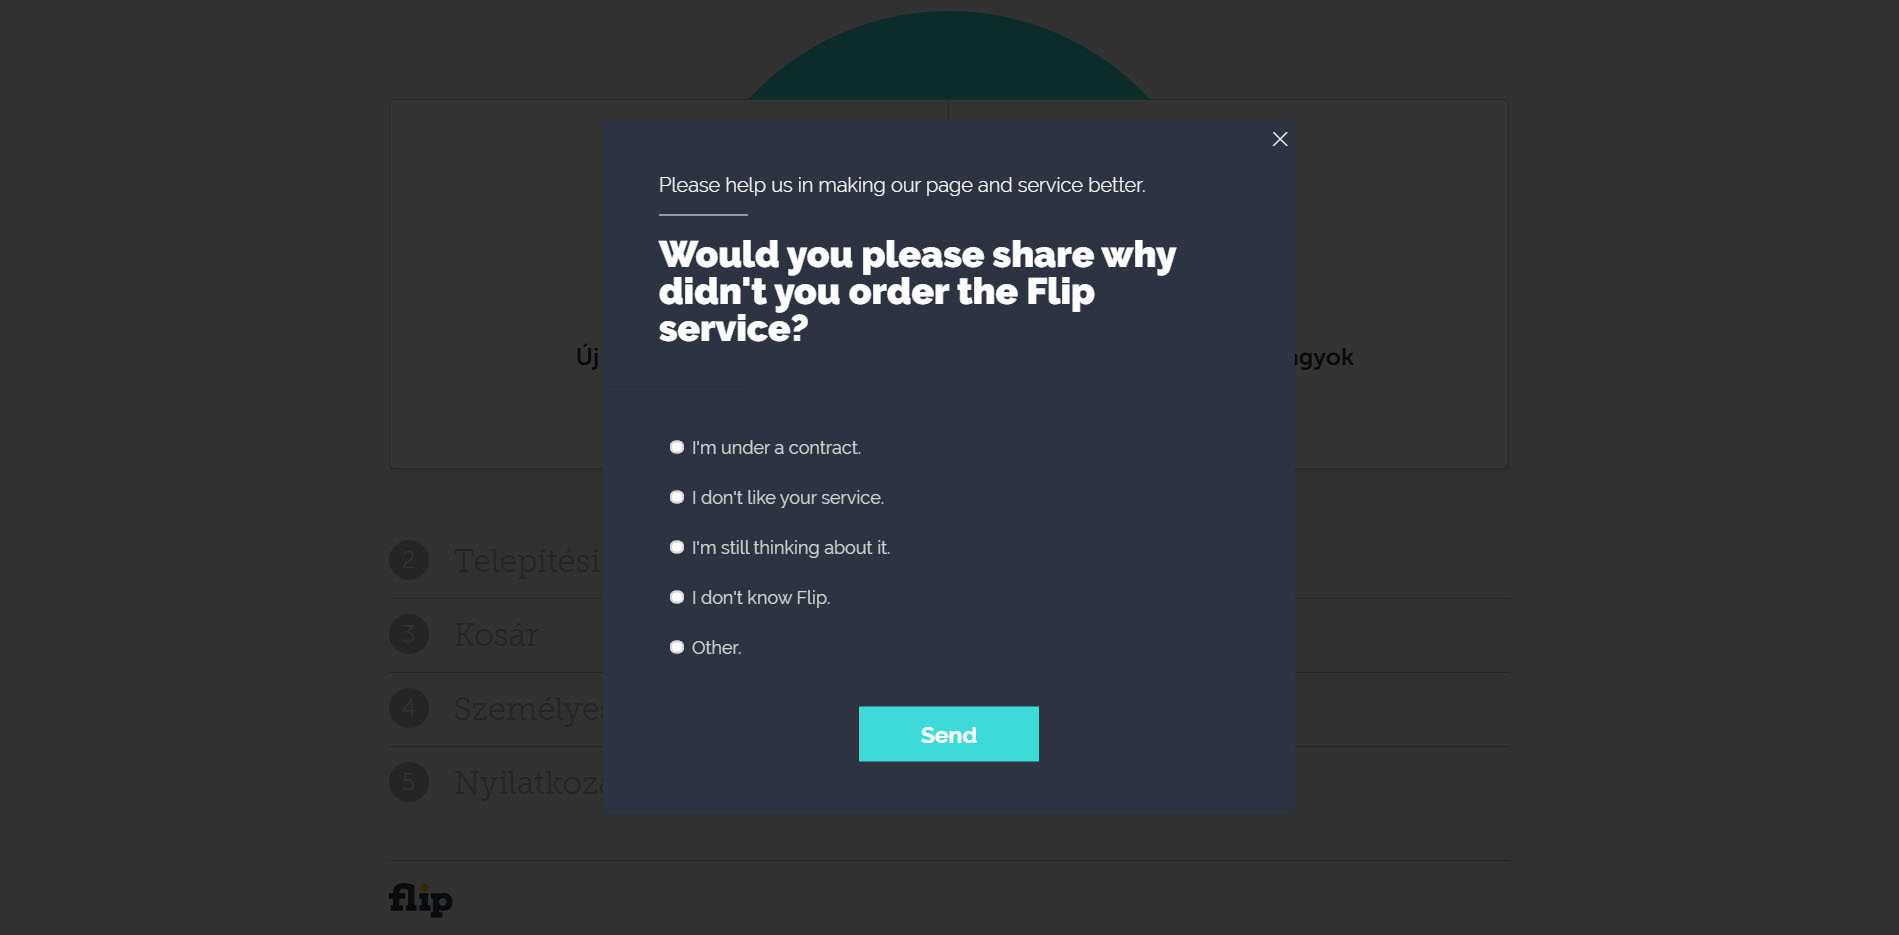
How to set it up:
This one is easy: simply choose an Exit Feedback Survey template and write in your own questions and answers.
Finally, make sure to set up an exit-intent trigger for those who are not leaving your site via the thank you page.
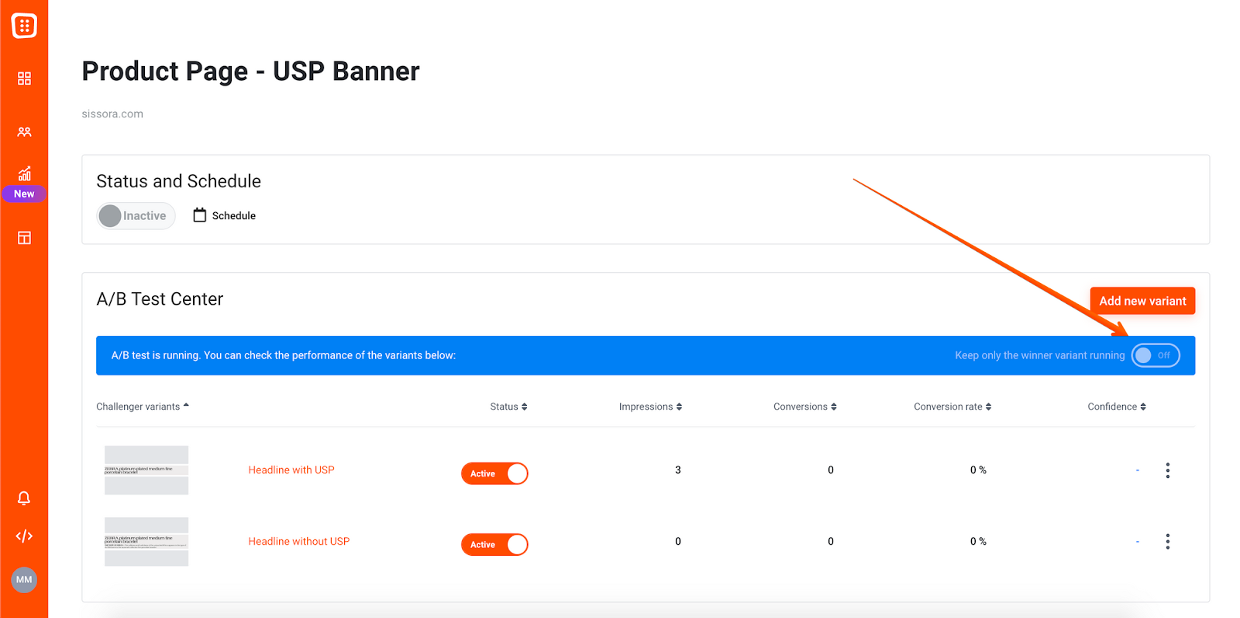
10. Test different value propositions on product pages
If your product pages are too feature focused, you might want to consider building in some value propositions (and shifting the focus to benefits) in order to connect with your visitors more successfully.
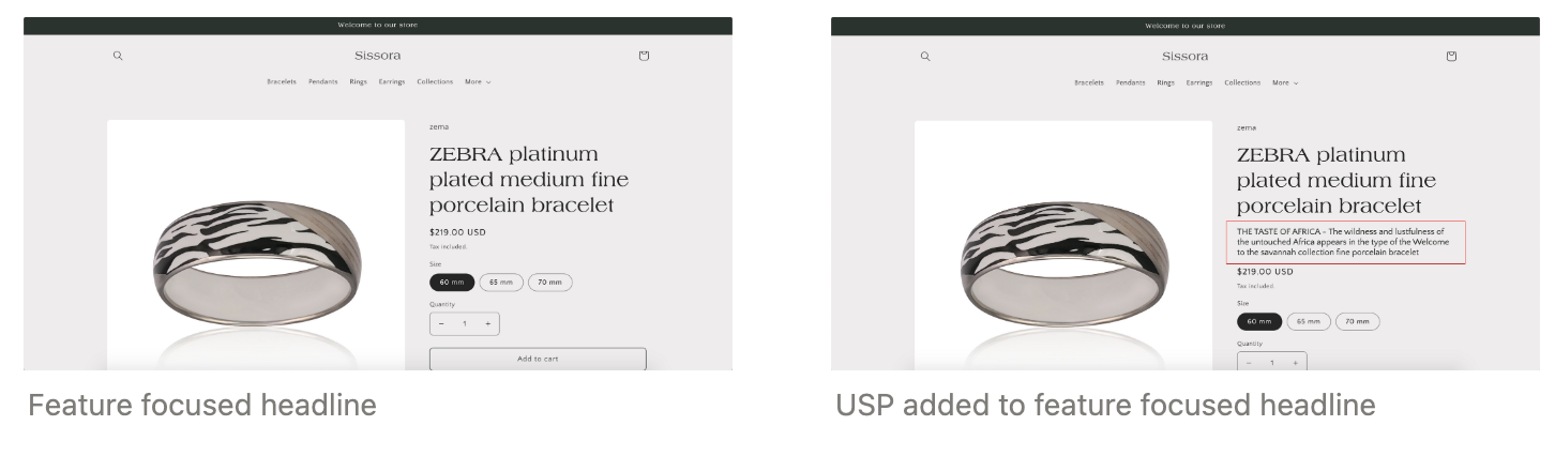
By testing different value propositions, the conversion rate of your product pages can increase by 50%.
How to set it up:
Choose an embedded message and finetune it to your style:
Then duplicate your campaign and modify your challenger variant.
In your control variant, you can rewrite the headline or sub-headline and you can change the images, color of the CTA, etc. Always make sure to change just one element in each variant—this way you’ll know for sure which element change caused the increase in your conversion rate.
And finally, activate your control variant!
11. Ask for custom data for more personalized email campaigns
The more personalized you can make your messaging, the more effective it will be. This is true for both popups and email marketing.
By asking for personal information from your customers, like their name, gender, or what types of products they’re interested in, you can segment your audience more effectively.
You can ask for this custom data in your email signup popup. This is a great place to ask for extra info, because you’ll be able to start a more personalized relationship from the very first newsletter you send them.
Here’s just one example of the custom data you could ask for:
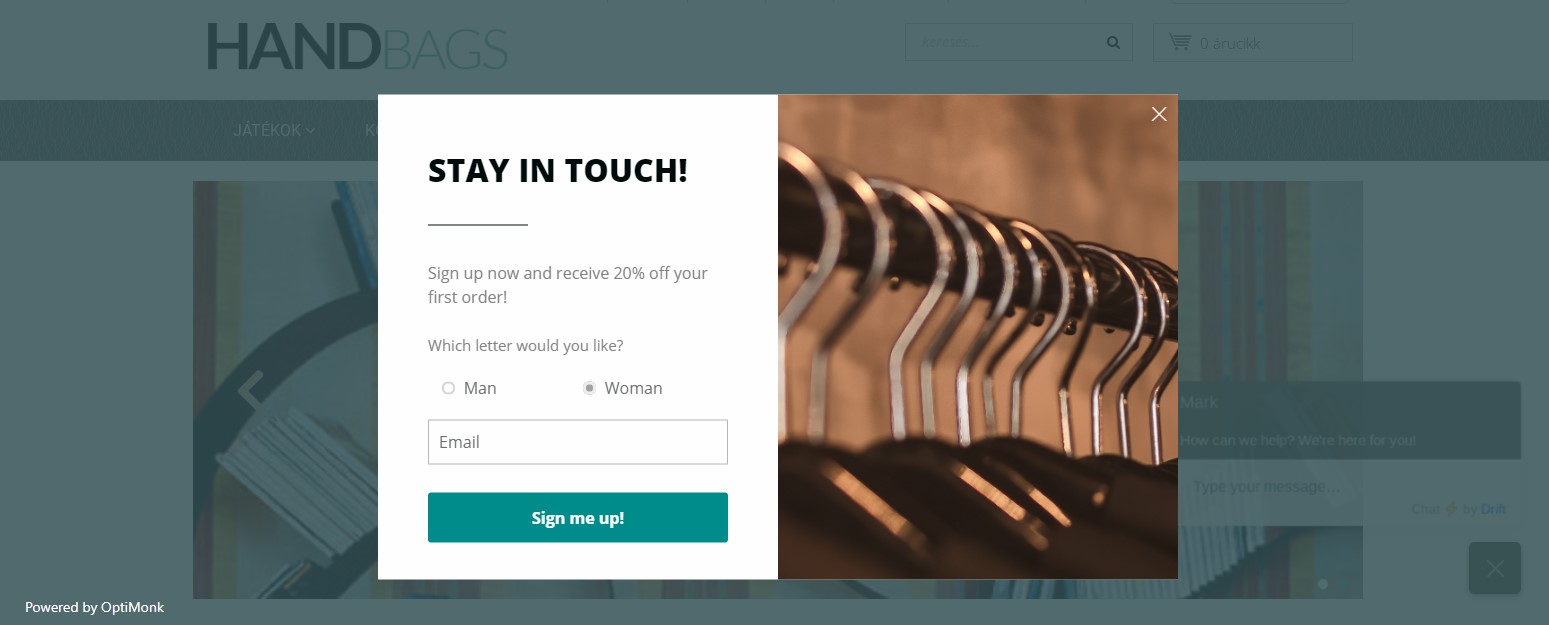
How to set it up:
To set this up, just drag a “Radio Button” element on the popup and enter the options based on how you want to differentiate your customers. This can be very straightforward, like asking their gender, or more subtle, like whether they prefer dogs or cats.
Once you’ve done that, set your targeting and segmentation as usual.
12. Gamify your popups
Gamification makes the shopping experience more fun, increasing the likelihood your popups will convert and grow your lists.
Less-engaged visitors who wouldn’t bother subscribing for a 10% discount will spin the wheel just to see what happens…and for a chance to win big.
Since there’s an element of immediate gratification to whatever level of discount someone ends up winning, they are more likely to use that discount immediately.
Here’s an example of a gamified popup:
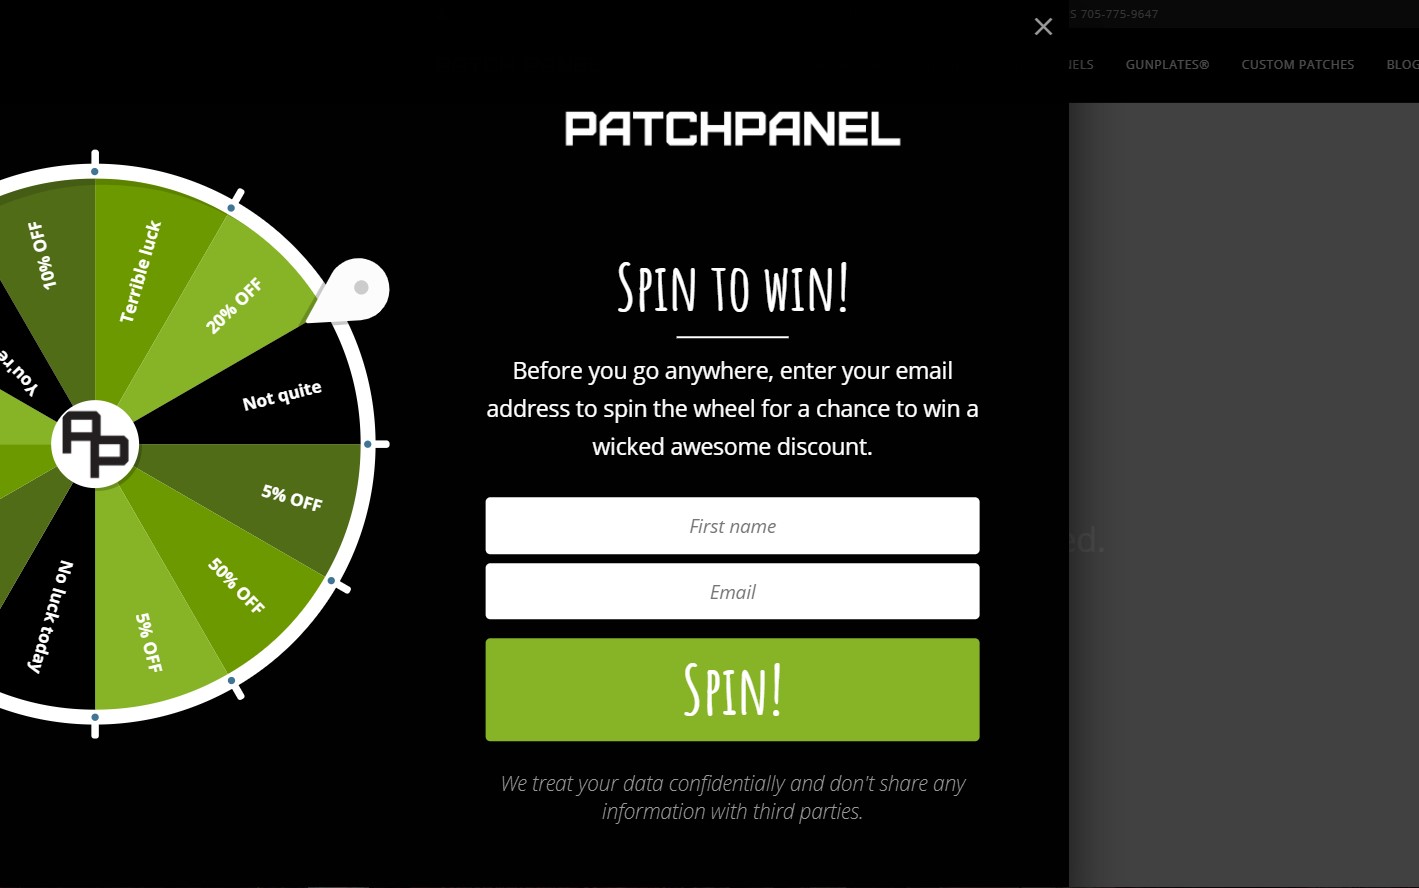
How to set it up:
For gamification, you can select one of the Spin-to-Win popup templates.
After customizing it to your needs, click on the Wheel in the Drag and Drop editor to set up which promotions and coupon codes you’ll make available. You can also adjust the odds of each outcome, maximizing your profitability.
Recap
That was a wild ride through many of the lesser-known use cases and hidden tricks you can pull off using OptiMonk 3.0 There’s a lot you can do with OptiMonk’s robust software, so you’re going to have to experiment yourself to get the absolute most out of your website.
Now that you know more about OptiMonk’s capabilities, it’s time to create your free account or log into your existing one to test them out for your own store.
And don’t forget to let us know in the comments below which solution worked best for you!
Share this
Written by