- Blog
- How to Build a Personalization Framework That’s Scalable
How to Build a Personalization Framework That’s Scalable
-
Nikolett Lorincz
- Personalization
- 6 min read
Table of Contents
If you want to stay current in today’s ecommerce world, you need a personalization strategy to deliver one-to-one messages to your target audience.
Luckily, there are many personalization tools out there that make it easy to target users based on their needs and interests. But taking full advantage of those tools requires a deep understanding of your customer base and audience segments.
In this article, we’ll show you a personalization framework that you can easily follow and a step-by-step guide on how to use it for your own ecommerce business.
Let’s get started!
A personalization framework that’s easy to follow
Treating personalization like a “one-and-done” improvement to your website isn’t a good approach.
Rather, you should think about a personalization framework as a process for continually learning more about your target audience and creating better and better messages for them.
An effective personalization strategy requires a cycle that continually moves from planning to launching personalization campaigns to evaluating their performance, and then back to the start. This means that you’re never really finished refining your personalization strategy—you’re always looking for ways to improve.
Here’s what that looks like:
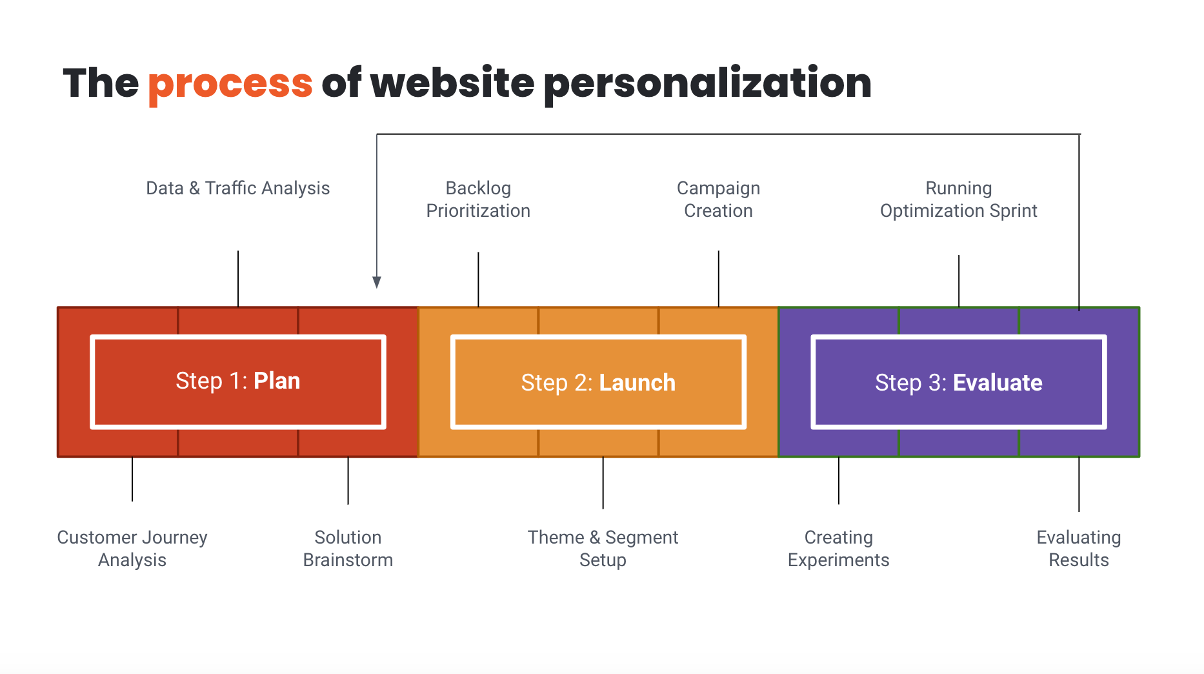
Now let’s take a closer look at the 3 main steps and what you should be thinking about at these different stages of your personalization framework.
Step 1: Planning
The first step of running successful personalization campaigns is about planning. This includes a customer journey analysis, a data & traffic analysis, and solution brainstorming.
During this stage, you want to find places where you’re losing a lot of customers (i.e. places where your sales funnel is leaky).
Running a customer journey analysis and digging into your data & traffic analysis is a great way to find out where you could be doing better.
For example, you might find that visitors who see a certain landing page rarely convert. That gives you the information you need to identify those users as an audience segment that needs more attention.
At that point, you should start thinking about different types of personalized messages those users would like to see.
Perhaps you could personalize the landing page based on traffic source, offering certain discounts for users arriving from Facebook or Instagram. Or you could run a lead generation campaign that encourages visitors to sign up for a newsletter in exchange for a discount on their first purchase.
Figuring out exactly what type of messages will resonate with different customer segments depends on many unique factors about your particular business situation, so you’ll have to be creative and lean into your understanding of your target audience.
Once you have a cache of personalization ideas ready to go, it’s time to move on to the next stage.
Step 2: Launching campaigns
Once you know what campaigns you want to implement, you need to actually launch them. This is where you prioritize your solution idea backlog and create the right messages for your segments.
The technical implementation of your campaigns isn’t as difficult as it sounds, since there’s lots of personalization software on the market that helps businesses create customized messaging.
Of course, exactly how you go about launching your campaigns depends on what personalization tool you’re using, but there’s one crucial consideration that you need to keep in mind no matter what. And that’s how you’ll prioritize your potential personalization ideas.
You’ll probably find lots of areas where your customer journey would benefit from personalization while analyzing your data. However, that doesn’t mean you should roll out solutions for all of your problem areas at once.
Instead, you should prioritize your personalization ideas and work on creating the right messages for the most important audience segments. This gives you a chance to do a really good job with each and learn as you go.
Then, as you continually work through your personalization framework, you’ll find opportunities to introduce more nuanced segments and more personalized messages.
Step 3: Evaluating your results
The third step of the personalization process is evaluation, and it’s no less important than the others.
Here, it’s all about looking at how the personalized messaging you’ve launched performs and looking for ways to improve.
You should be A/B testing different personalized variations of your campaigns to see whether small differences in copy or design can lead to better results. You’ll also want to test out your personalization campaign against the basic version of your website. After all, when you first launch campaigns, they’re more like personalization hypotheses than sure bets.
Once you’ve evaluated your campaign along these lines, it’s time to go back to step one and decide on the next steps.
Website personalization is continuous experimentation. Your patience and resources are the only barriers.
A step-by-step guide for a truly effective personalization strategy (using the personalization framework)
Now that we’ve had a quick look at the framework, let’s see how it works in practice!
1. Analyze your current customer journey
As we went over above, analyzing your customer journey is the best place to start when building a personalization strategy. But how do you actually go about doing that?
Well, it’s important to try to empathize with your customers and look at your sales process through their eyes. Here are some questions that can help you do that:
- How does the typical visitor arrive at your website? Do you have diverse sources of traffic?
- Should a visitor arriving via a Facebook ad see the same type of content as someone arriving from search results? What about a visitor arriving from Instagram?
- Should you change your main offer for different audience segments? Perhaps a low-intent visitor wants to see different content than a high-intent visitor?
- How big is your inventory? Is it difficult for your visitors to find the products they’re looking for?
These questions can help you figure out which parts of your shopping experience are challenging for your customers.
If answering any of these questions is difficult for you, try checking out your website using incognito mode so that you can see exactly what your customers are seeing.
You can also reach out and ask for feedback from your customer base.
2. Analyze your data for more insights on your traffic
Once you have an overall understanding of the customer journey, it’s time to get into the customer data and look at your analytics.
You should try to identify pages that have high traffic but a low conversion rate. These are places where a better user experience can lead to a higher conversion rate.
Often, these will be at the same stage of the customer journey you identified as difficult in the last step, but sometimes you’ll be surprised. That’s why it’s essential to use hard data for your personalization efforts rather than picking segments haphazardly.
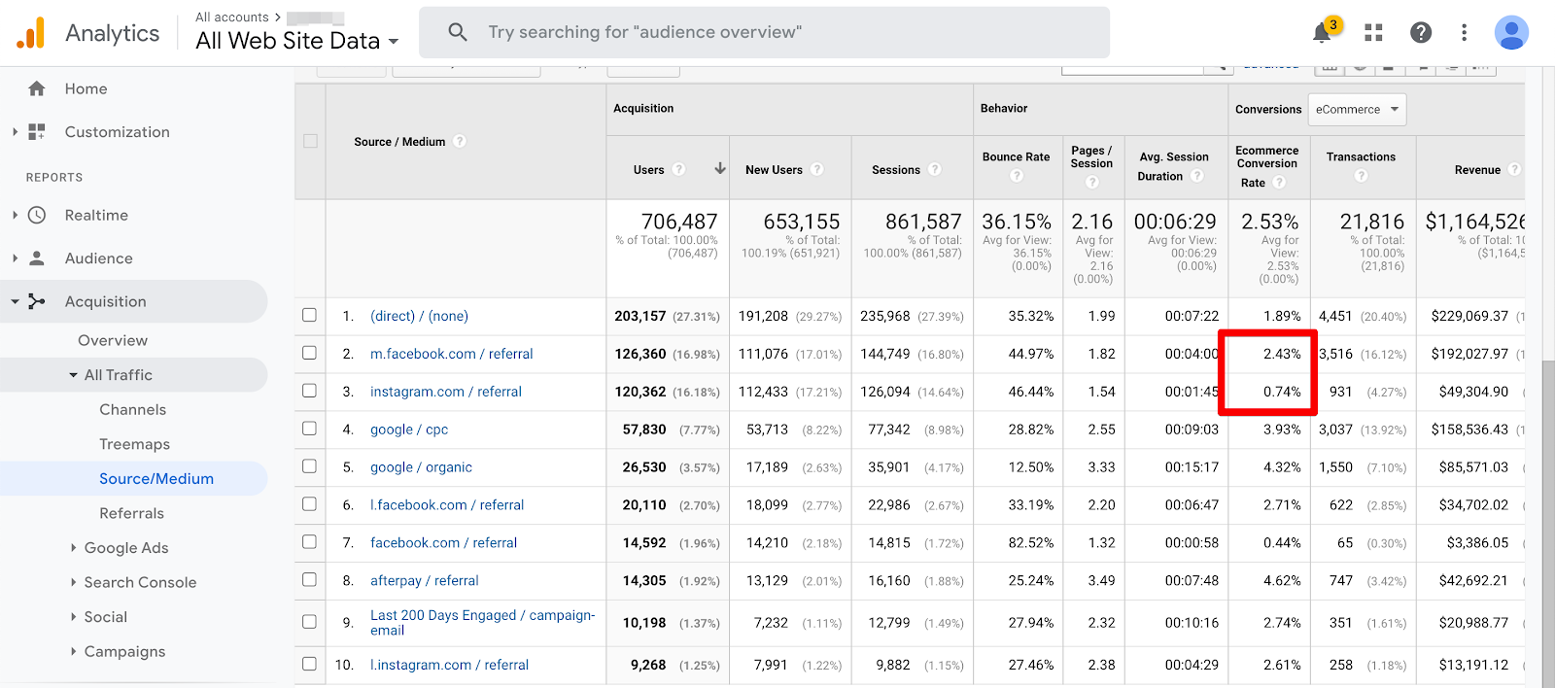
For example, in the screenshot above, you can see that many visitors are arriving from Instagram, but they aren’t converting very well. Those coming from Facebook, however, convert at a much higher rate.
This is exactly the sort of insight you should use to build your personalization strategy.
Why are the potential customers coming from Instagram converting at such a low rate? Perhaps they’re having a worse experience than visitors from Facebook.
That’s something you can solve by creating additional marketing messages for this segment. And as a result, the conversion rate of this segment should increase.
You should look for similar red flags in the following reports in your Google Analytics account:
- New vs returning visitors
- Visitors using mobile devices vs desktops
- Source/medium and campaigns
- Landing pages
- Keywords
- Ecommerce overview
- Shopping behavior
Personalization represents a chance to use this segmentation data to improve your website for the specific groups who aren’t converting well.
3. Brainstorm ideas for solutions
Now you have a list of pain points that need your attention. At this point, you should start thinking about solutions to the problems you’ve found. This is the hardest part, but it also gives you the opportunity to get creative with your website personalization.
Each pain point you’ve identified calls for a unique solution that responds to what your audience needs.
For example, let’s say you have a very high cart abandonment rate. There are lots of options for how you could go about addressing this problem, including:
- Offering a 10% discount to cart abandoners with a popup
- Promoting your free shipping policies to encourage cart abandoners to complete their purchase
- Promoting lower-priced alternatives to the items in a customer’s cart
- Setting up cart abandonment emails
You should consider what type of message your customers would most like to receive. For some stores, this will be a simple discount offer, but other audiences might appreciate seeing lower-priced alternatives.
If you think your audience will think that any of the options above are too pushy, you might try asking for feedback from cart abandoners. This won’t affect your cart abandonment rates, but you’ll learn a lot about why people abandon your site and how you could stop them.
You’ll probably have multiple solution ideas similar to the list above for each pain point. If you’re stuck on any of them, watch this video that includes lots of personalization ideas for ecommerce stores:
4. Prioritize your idea backlog
If you’ve gone through the first three steps, you’ve probably got lots and lots of ideas for how you could use personalized content to improve your website. And there will (usually) be more ideas than you could reasonably implement all at once.
That means you’ll have to decide which personalization hypotheses you want to try out first.
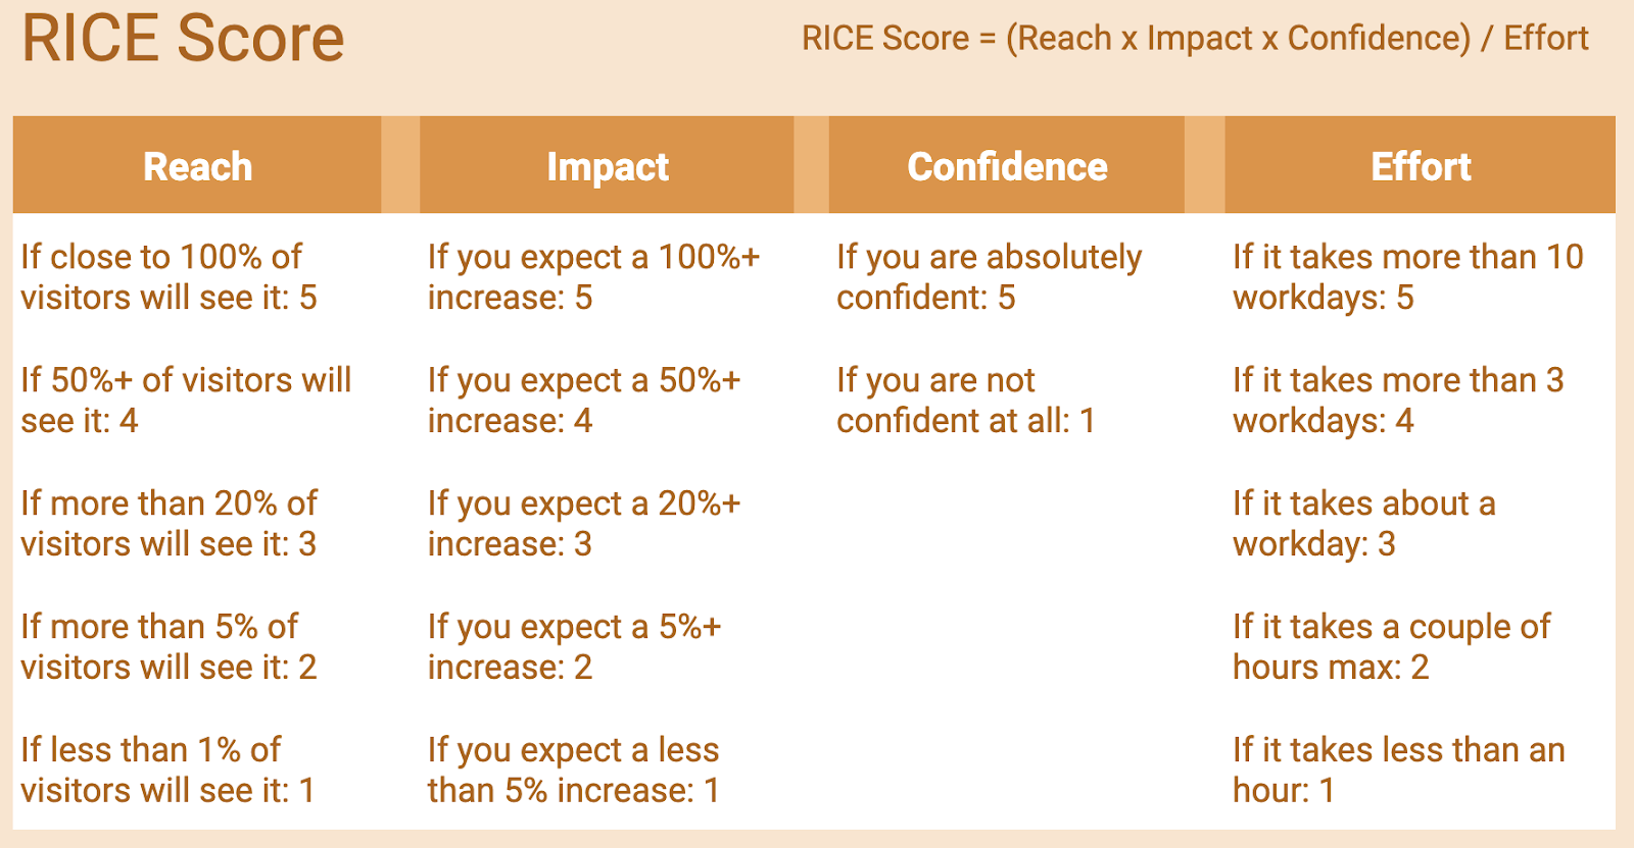
We suggest using the RICE method for prioritizing your ideas. It combines a number of factors (reach, impact, confidence, and effort) to help you decide which ideas are best to pursue.
Basically, you’ll give each idea a score based on what its reach will be, how large you expect the impact to be, etc.
Here’s a visual guide on how to use the RICE scoring system:
After you score each of your ideas, you might have a list that looks something like this:
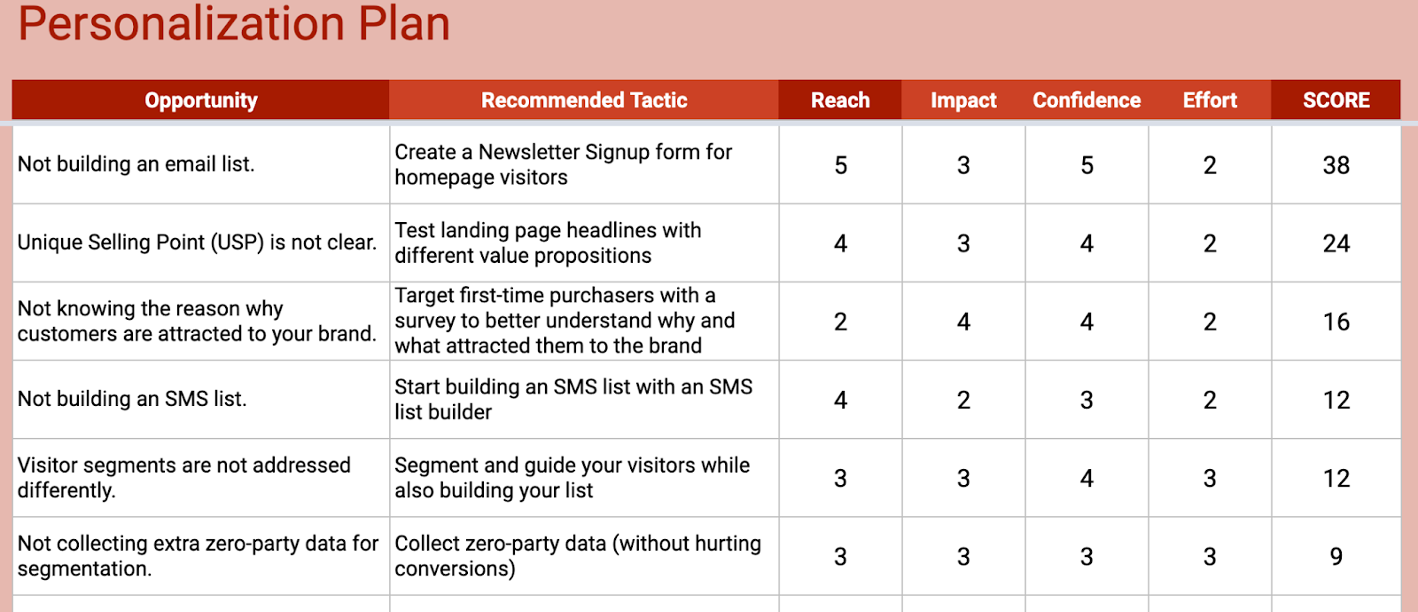
This personalization ideation step helps you avoid getting lost in ad hoc implementation. Instead, you’ll know exactly what to focus on and in what order.
5. Create the campaigns
Finally, it’s time to get down to business and create your campaigns. Launching the first two or three campaigns from your prioritized list is a great start.
For each campaign idea you implement, you need to work hard to find the right way to highlight its value proposition. The benefit to the customer should be clear as soon as they see the campaign.
You’ll also want to spend some time thinking about the best format for your personalized message. Some campaigns work best as popups, but others would be much better as embedded content on your website or a sticky bar.
Finally, you’ve got to design the visual look of your campaigns using personalization software. Then it’s time to press launch!
You can check out this video for more tips about how to craft a high-converting message:
6. Run experiments to test different ideas
Let’s back up for a second—how can you be sure that the campaign message you’ve chosen to go with was the best choice? Remember, when we were talking about campaigns to halt cart abandonment, there were a number of possible solutions.
This is where experiments come into the picture!
You can test two versions of your personalized campaigns against each other to find out which one works best for your audience. Without trying both discount and free shipping cart abandonment popups, you’ll never know for sure what version will have a higher conversion rate.
Marketing optimization is all about testing out your personalization hypotheses and learning from that process. If you only run with the ideas that make sense to you, there’s a risk that your personal biases will get in the way of your profits.
Whether you’re deciding on the best audience segments to target or choosing between several offers, make sure to confirm (or disprove) your suspicions using data.
7. Evaluate results and optimize
After you’ve launched your campaigns, it’s crucial to use data to evaluate their performance.
First, though, you’ll need to decide which key performance indicators (KPIs) you’re going to use to measure success. There are many different KPIs used in ecommerce, so you’ll need to select the ones that make the most sense for your business.
You can choose between:
- Leading indicators, which record actions that someone takes immediately upon seeing a personalized message—like click-throughs or signups.
- Lagging indicators, which take some time to show up after a customer has seen a personalized message—like sales or customer lifetime value.
Generally, it’s much easier to measure leading indicators, since you know immediately whether your message has been successful or not. Most personalization software will be able to track these indicators for you.
However, lagging indicators are more tricky. A lead generation popup, for instance, might lead to a sale two weeks down the line. If you’re only using a simple analytics tool, you probably won’t be able to attribute that sale to the fact that the customer signed up for your newsletter. You’ll probably need more complex analytics solutions to test your personalization hypotheses using lagging indicators.
Based on the results of your evaluation, you’ll want to optimize your campaigns by choosing the most successful variants and refining your customer segments. You never know what your future audience segments will be until you’ve finished this step!
8. Go back to step one
As mentioned, personalization is an ongoing process. This means that as you evaluate the results, you’ll need to go back to the beginning of the framework and do it all again.
After you’ve implemented your first few campaigns, you’re likely going to have many additional marketing messages you want to run. Fine-tuning what you’ve already started and introducing new messages take a lot of planning, but the results will be well worth it!
Wrapping up
Ecommerce personalization is advancing at a rapid rate, so it’s important to stay on top of the latest trends. Recently, customer self-selected personalization strategies are all the rage, as are machine learning systems that take basic personalization to the next level.
After going over the ins and outs of creating a personalization strategy, it’s clear that a serious attempt at personalization requires dedicated resources. You can’t just spend an afternoon setting up your personalized messages and then forget about them. As we’ve seen, developing a winning personalization strategy requires a constant cycle of planning, implementation, and evaluation.
Although personalization can seem intimidating, the good news is that there’s great personalization software out there that can help you make the most of your personalization efforts.
If you’d like to try out the personalization framework we’ve covered in this article, we’d recommend signing up for a free OptiMonk account. This comprehensive personalization solution makes it easy to create, launch, and evaluate personalized experiences on your website.
Give it a try today!
Migration has never been easier
We made switching a no-brainer with our free, white-glove onboarding service so you can get started in the blink of an eye.
What should you do next?
Thanks for reading till the end. Here are 4 ways we can help you grow your business:
Boost conversions with proven use cases
Explore our Use Case Library, filled with actionable personalization examples and step-by-step guides to unlock your website's full potential. Check out Use Case Library
Create a free OptiMonk account
Create a free OptiMonk account and easily get started with popups and conversion rate optimization. Get OptiMonk free
Get advice from a CRO expert
Schedule a personalized discovery call with one of our experts to explore how OptiMonk can help you grow your business. Book a demo
Join our weekly newsletter
Real CRO insights & marketing tips. No fluff. Straight to your inbox. Subscribe now
Share this article
Written by

Nikolett Lorincz
Nikolett is the Head of Content at OptiMonk. She is obsessed with content marketing and loves creating educational content for ecommerce store owners. She truly believes in the importance of quality over quantity.
You may also like
- Posted in
- Personalization
Partner with us
- © OptiMonk. All rights reserved!
- Terms of Use
- Privacy Policy
- Cookie Policy
Product updates: January Release 2025