Would you give up coffee or Netflix to get free shipping?
According to a recent survey, 25% of respondents would—if they could have free shipping on all their online orders!
If you’re a coffee and Bridgerton lover like us, this might seem absurd, but these statistics show that free shipping is one of the strongest incentives you can offer to your visitors.
Shipping fees are a major concern for customers, so if you can eliminate them, you’ll be way ahead of the pack.
In this article, we’ll show you how to set up free shipping on Shopify and how to promote it.
Let’s go!
What is free shipping?
Let’s start with the basics: what is free shipping exactly?
Free shipping is a popular marketing strategy that ecommerce businesses often use. By offering free shipping, the seller covers the shipping expenses instead of charging the customer.
In short: customers are not charged for any additional fees for their purchases, just the listed price of the product.
Over the last couple of years, we see a trend: free shipping has gone from being considered a “bonus” to being something customers demand, impacting purchasing choices significantly.
In fact, studies have shown that one of the major reasons for cart abandonment is unexpected shipping costs.
Types of free shipping
Now, let’s take a look at the two ways you can provide free shipping for your visitors.
- Conditional free shipping: This involves offering free shipping based on certain conditions, such as minimum order price or purchasing a specific item.
- Across-the-board free shipping: Online shoppers can enjoy free shipping on everything, and no rules apply. With this approach, customers receive free shipping on all items without any restrictions. However, merchants should consider their profit margins and shipping costs before implementing this approach.
Pros and cons of offering free shipping
Offering free shipping on Shopify can be a powerful marketing tool, but it’s worth considering the pros and cons of it.
Pros:
- Increased conversion rates: Offering free shipping often boosts conversion rates as customers are more likely to make a purchase when there are no additional shipping costs.
- Competitive advantage: In a crowded market, you can set yourself apart from other businesses if you offer your customers free shipping.
- Higher order values: Free shipping can encourage customers to increase their average order value, as they may buy more items or spend more to qualify for free shipping.
- Improved customer satisfaction: No shipping costs=happy customers. Eliminating shipping fees results in happier shoppers who are more likely to return for future purchases.
- Marketing opportunity: Free shipping is a good way to acquire new customers, increase customer loyalty, and boost your sales.
Cons:
- Increased costs: Covering shipping expenses can reduce profits, especially for small businesses with limited budgets.
- Complex logistics: Offering free shipping may require adjustments to shipping methods, negotiating better rates, or finding more efficient packing solutions.
- Risk of abuse: Some customers may exploit free shipping offers by making unnecessary purchases (that they’ll later return) to qualify for the minimum purchase, leading to higher costs and lower profitability.
- Lower perceived value: Constant free shipping may diminish the perceived value of products or services, turning it into a regular expectation rather than a special promotion.
- Potential for higher return rates: Customers may be more inclined to return items if shipping costs were seen as a barrier to purchase, resulting in increased return costs and inventory management complexities.
How to set up free shipping on Shopify?
Ready to set up free shipping on Shopify? We’ve got you covered.
Use our step-by-step guide to l how to set up free shipping on Shopify.
Step 1: Navigate to shipping settings
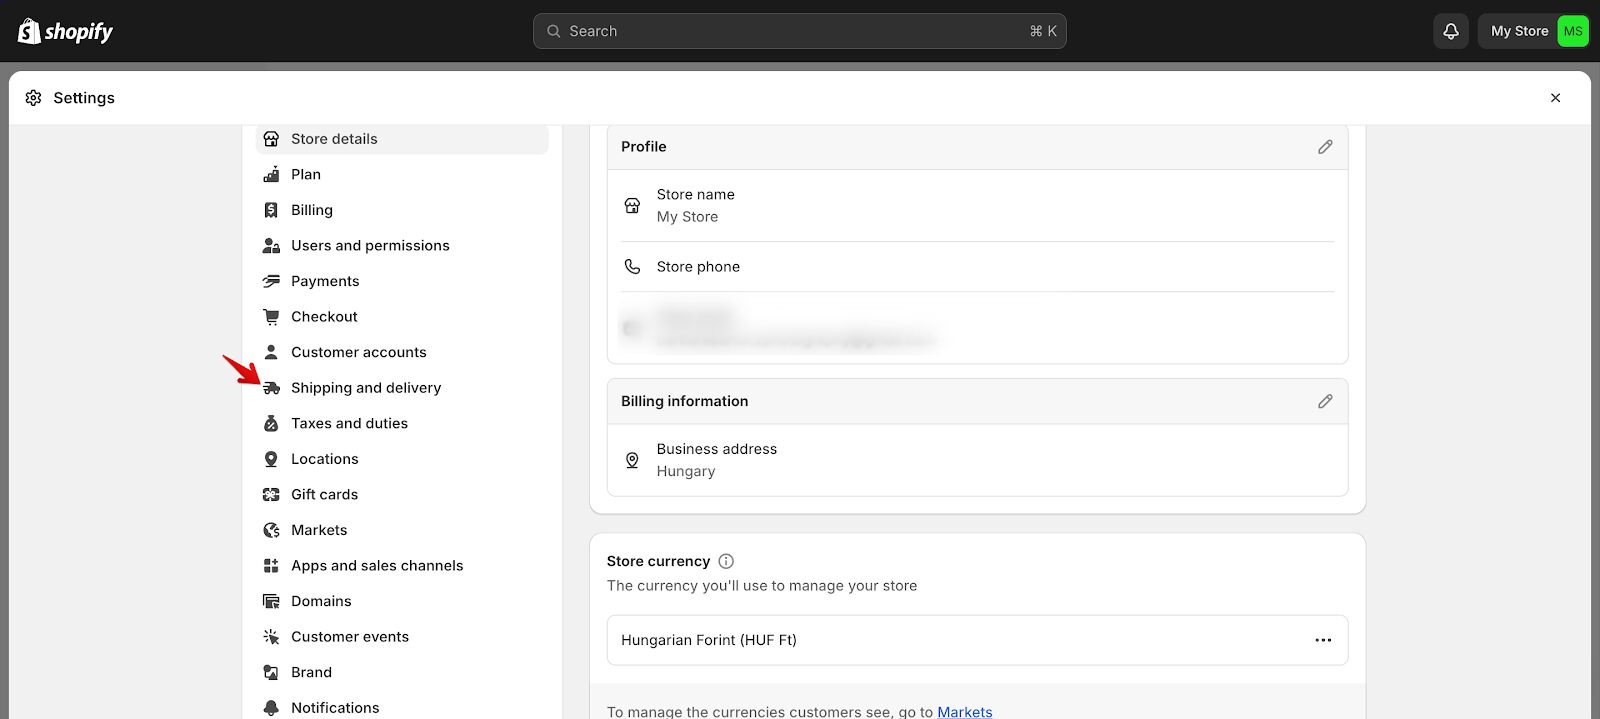
First, you’ll want to log in to your Shopify account and access the admin panel. From the Shopify admin dashboard, click on “Settings,” which is located in the bottom left corner..
Then, select “Shipping and delivery”:
Step 2: Set up shipping zones
Next, in the “Shipping and delivery” settings, scroll down until you reach the “Shipping zones” section.
Click on “Add shipping zone” to establish a new shipping zone.
Name the shipping zone accordingly (e.g., “Domestic,” “International,” etc.).
Specify the countries or regions encompassed within the shipping zone by selecting “Add countries/regions,” and save the shipping zone settings.
Step 3: Configure shipping rates
Within each shipping zone, locate and click on “Add rate” to set up shipping rates. Next, from the dropdown menu for the rate type, choose “Free shipping.”
If you wish, you can establish conditions for free shipping, such as a minimum order value or specific products. Then, save your shipping rates.
Step 4: Customize shipping settings
Return to the “Shipping and delivery” settings. Scroll down to the “Shipping zones” section and select the shipping zone you want to adjust.
Now, you can review and make any necessary changes to the shipping rates you’ve set.
Once you’ve verified that the free shipping rates are properly set up and activated, save your changes.
Step 5: Test free shipping
Now, let’s make sure the free shipping on your Shopify store is working properly.
First, make a pretend purchase on your store to see if free shipping kicks in correctly. Go through the checkout process and make sure you see the free shipping option.
Double-check that you’ve met any requirements for free shipping (like minimum order value), and that the shipping cost shows up as $0 when it should.
How to create a free shipping discount code?
Now that you’re all set with your free shipping rates, let’s find out how to add free shipping discount codes to your online store.
Step 1: Navigate to discounts
Enter your Shopify admin dashboard, and click on “Discounts,” which is located in the left-hand menu. Once you’ve clicked on “Discounts,” select “Create discount” to start the process of generating a new discount code.
Step 2: Choose the discount type
In the “Discount code” section, input a unique discount code that customers will apply at checkout to redeem free shipping.
Next, from the dropdown menu “Discount type,” opt for “Free shipping” to ensure customers are granted free shipping for their orders.
Step 3: Configure discount details
Make sure that your discount names are descriptive: enter a name for the discount code to help you identify it in your Shopify dashboard.
Additionally, you have the option to include a description that outlines any specific conditions or limitations associated with the discount code.
Specify the start and end dates for the discount if you want to impose a time limit on its availability.
You can also establish additional conditions such as a minimum order value or eligibility requirements for certain products to qualify for free shipping.
Step 4: Limit usage (optional)
If you want to limit your free shipping discount codes, this is the step where you can do it by setting a maximum number of times it can be used.
Alternatively, you can restrict the discount code to one use per customer to prevent potential misuse or abuse.
Step 5: Review and save
Take a moment to review all the details you’ve entered to ensure everything is set up the way you want.
Double check the start and end dates, any restrictions or conditions, and the uniqueness of the discount code.
Once you’re satisfied that everything looks good, click “Save” to create the free shipping discount code.
How to promote your free shipping offer on popups?
It’s not enough to simply have a free shipping code, you also have to promote it. Popups and sticky bars are great tools for grabbing people’s attention and showcasing your codes.
With OptiMonk, you can effortlessly set up both popups and sticky bars to promote your free shipping discounts or even automatically highlight your free shipping threshold.
Start by installing the OptiMonk app from the Shopify App Store with just one click.
Once you’ve signed up for a free account, you can begin using OptiMonk’s extensive library of over 300 templates.
Here are some popup templates:
Here are some free shipping bar templates:
And here are some sidemessage templates:
How to set up a dynamic shipping bar
Keeping your visitors updated about shipping conditions is a wise tactic.
By promoting free shipping dynamically, your visitors will be aware of the minimum purchase amount and how much extra they need to spend to get free shipping.
Step 1: Choose a sticky bar and fine-tune it to your style.
Take a look at our wide selection of sticky bars and choose one that suits your website’s design and branding, or tailor it to your brand.
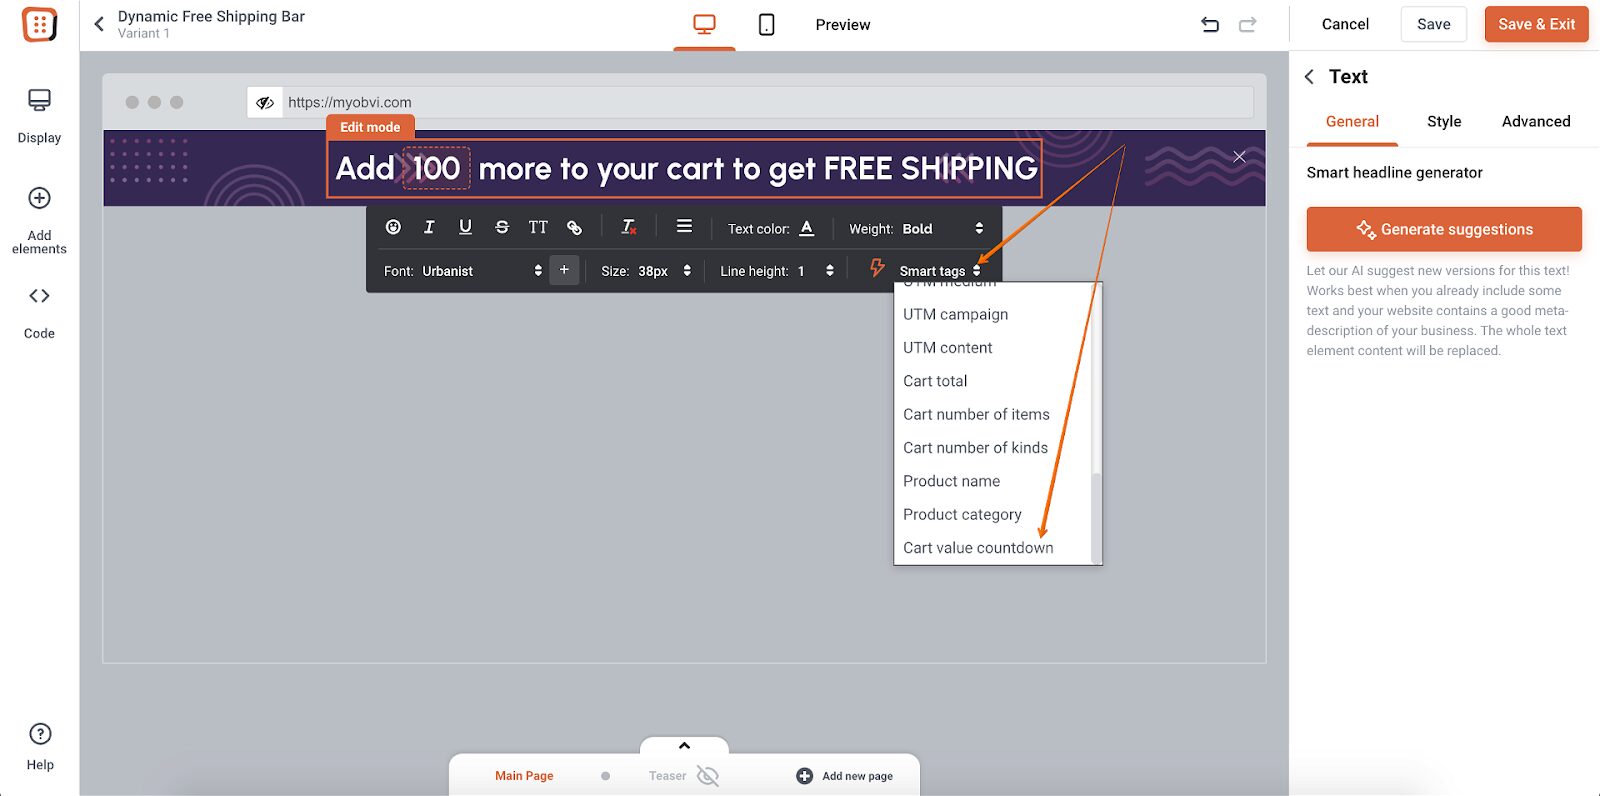
Step 2: Insert a Smart Tag into the text.
Insert the “Cart value countdown” Smart Tag into your campaign. If your free shipping threshold is set at, say, $100, make sure to set this as the default value.
Step 3: Create a second page on your sticky bar.
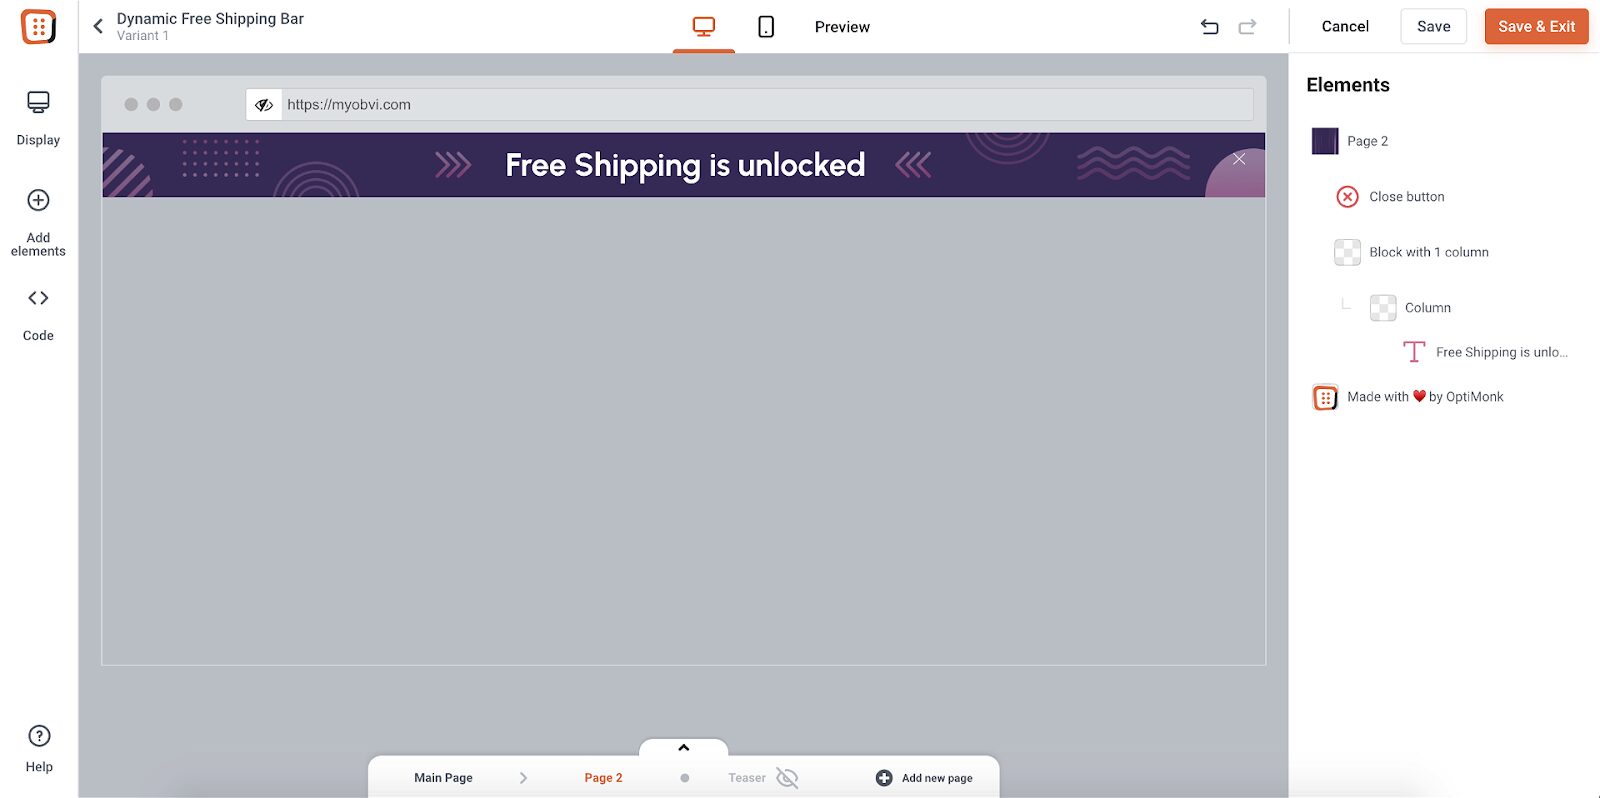
By duplicating your main page and adding text for when your visitor reaches the free shipping limit, you’ll ensure a seamless transition.
This second page will automatically show up when the visitor hits the free shipping threshold—it doesn’t require any additional configuration.
Step 4: Create more pages for more thresholds.
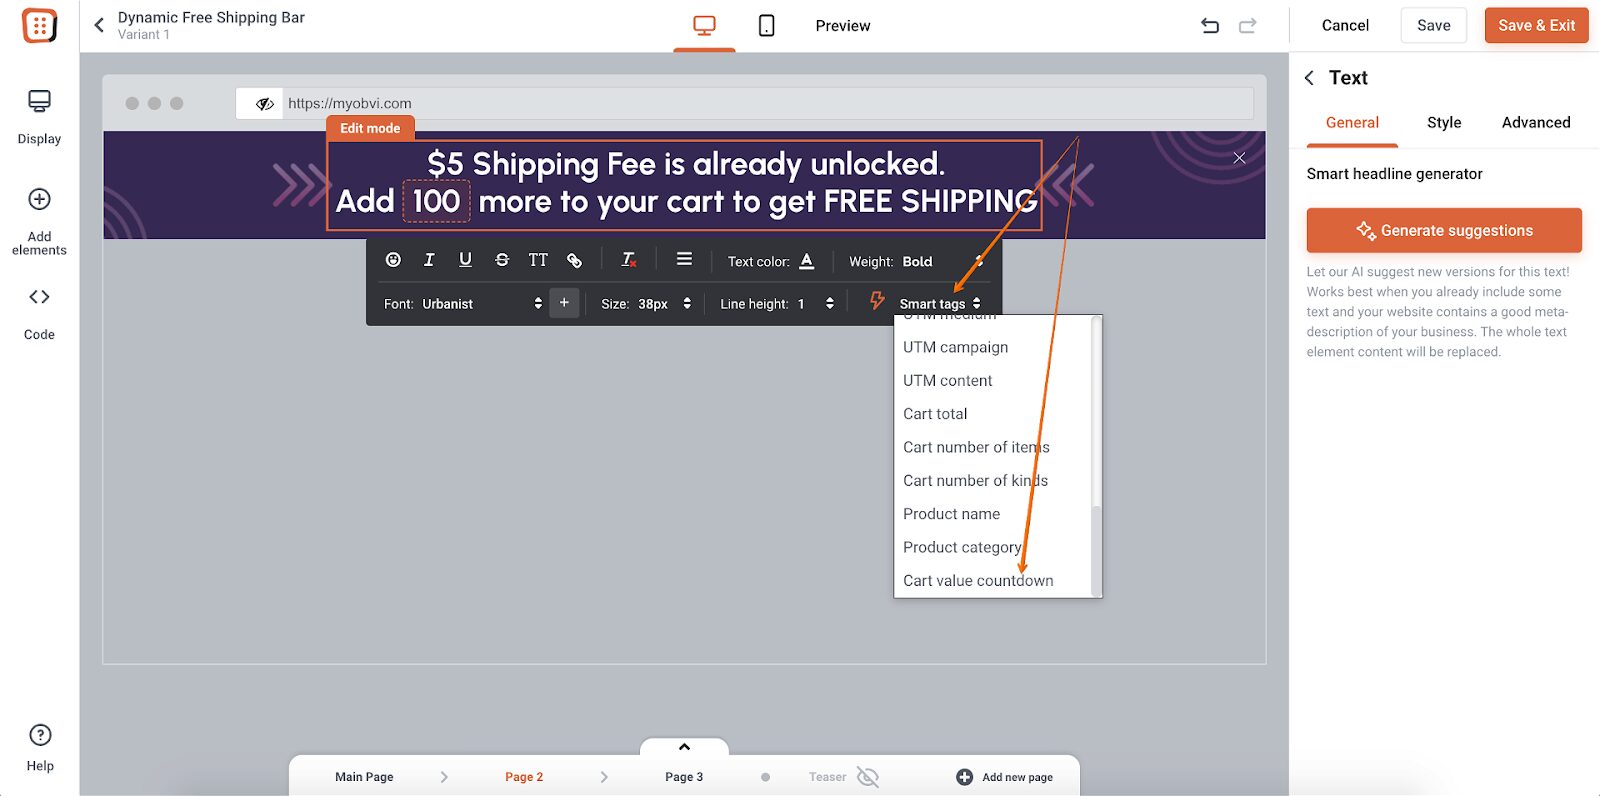
If your Shopify store offers free and discounted shipping based on different order totals, you can set up multiple pages within the sticky bar.
For example, if you have a $10 shipping fee for orders below $50, $5 for orders between $50 and $100, and free shipping for orders over $100, you’ll need to create three pages—one for each range.
How to set up a localized shipping bar
Now, it’s time to bring your free shipping bars to the next level and personalize them based on your online shoppers’ location.
Luckily, with OptiMonk, you can do that in no time.
Step 1: Create a sticky bar and fine-tune it to your style.
Start by creating a sticky bar that matches your website’s style. You can use our templates as a starting point:
Step 2: Create a new Personalized Experience.
If you want to learn more about Personalized Experiences, click here.
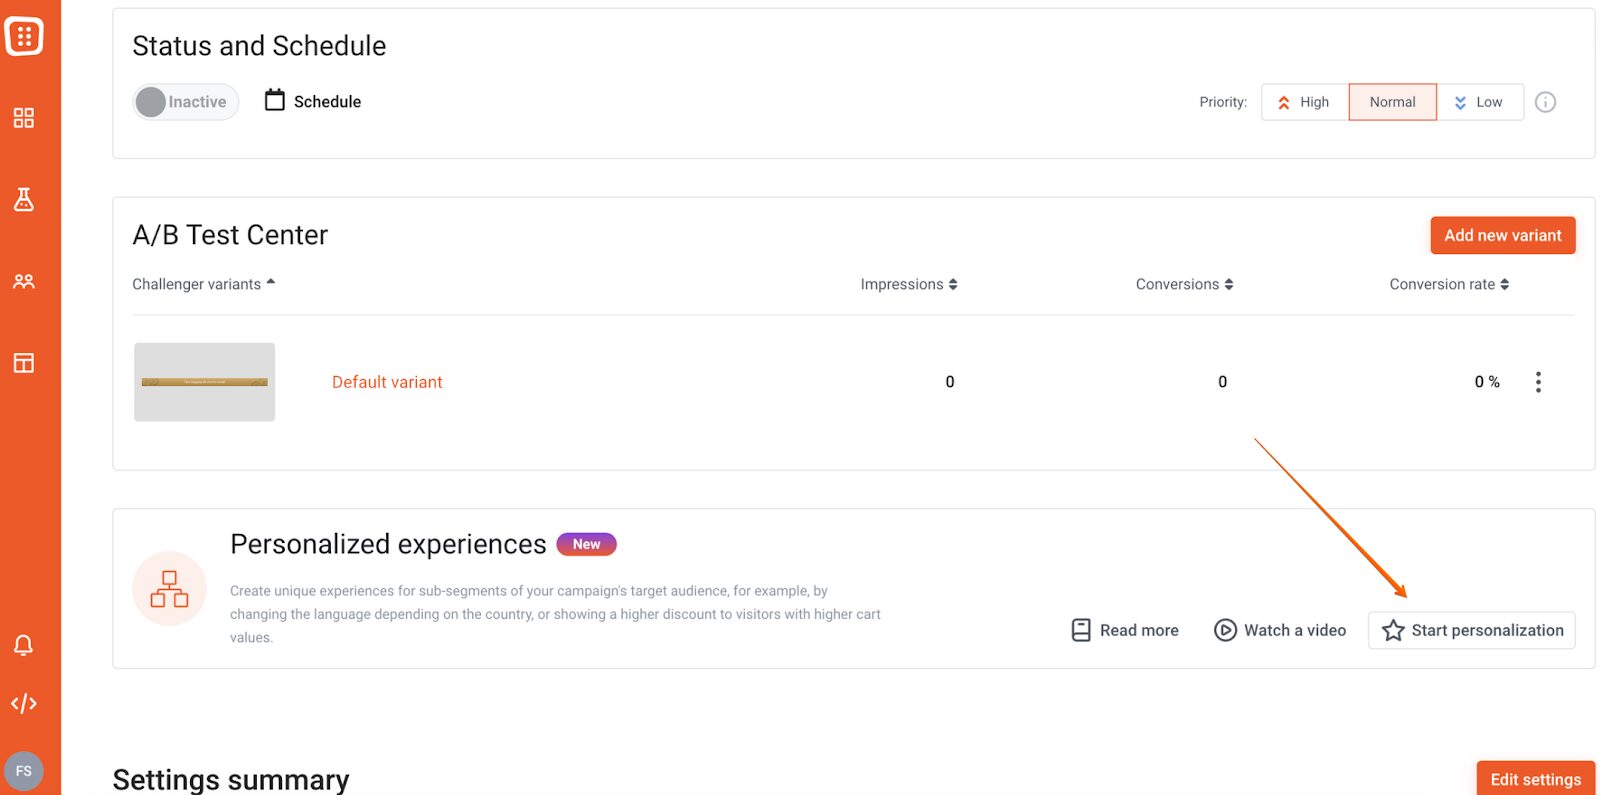
Add a new variant to Experience B and Experience C. Your original campaign (the default variant) is in Experience A.
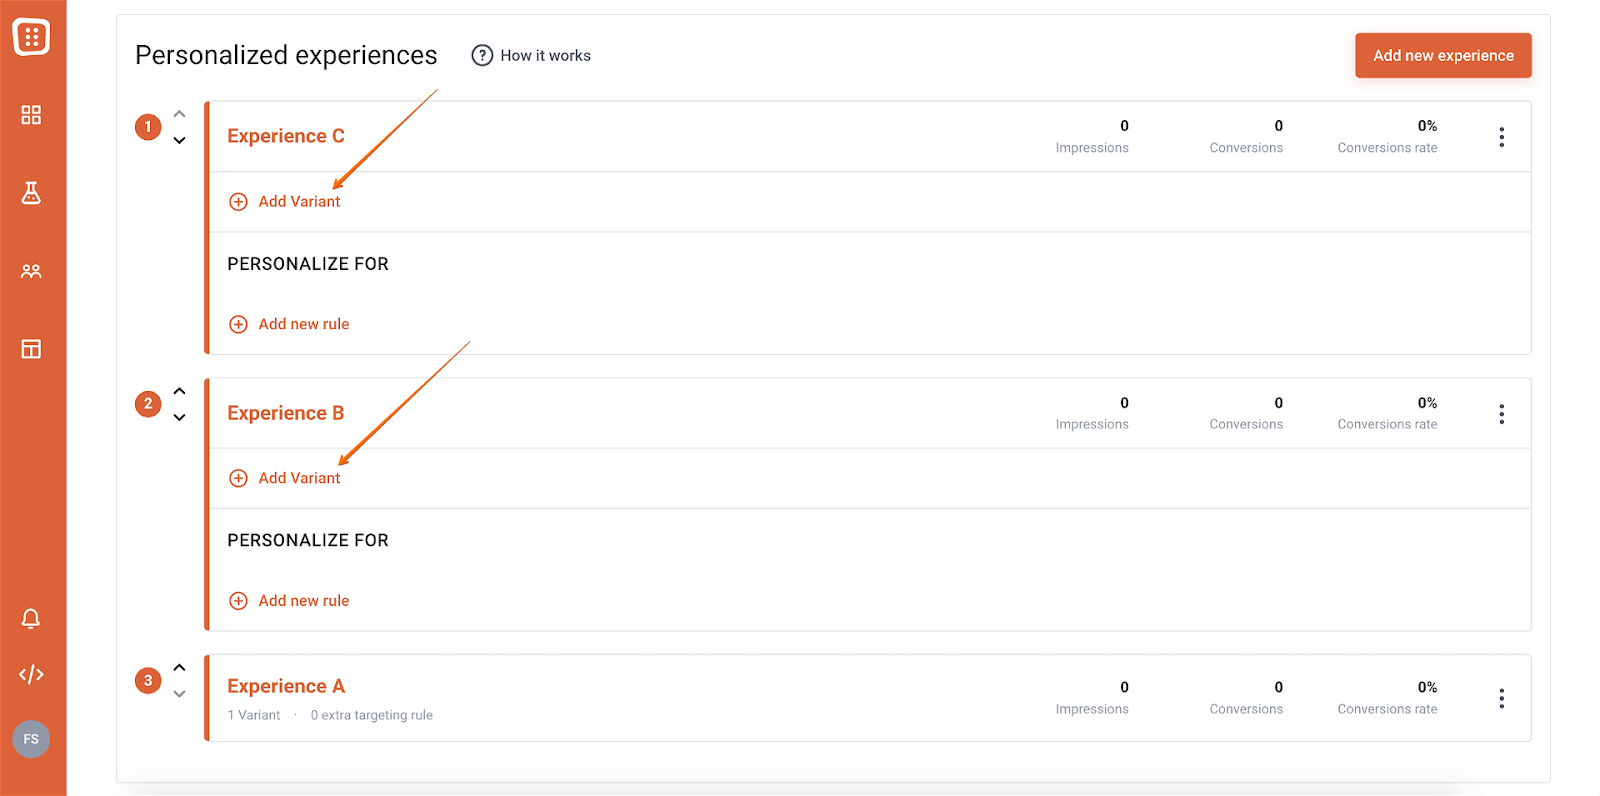
Step 3: Personalize your new variants.
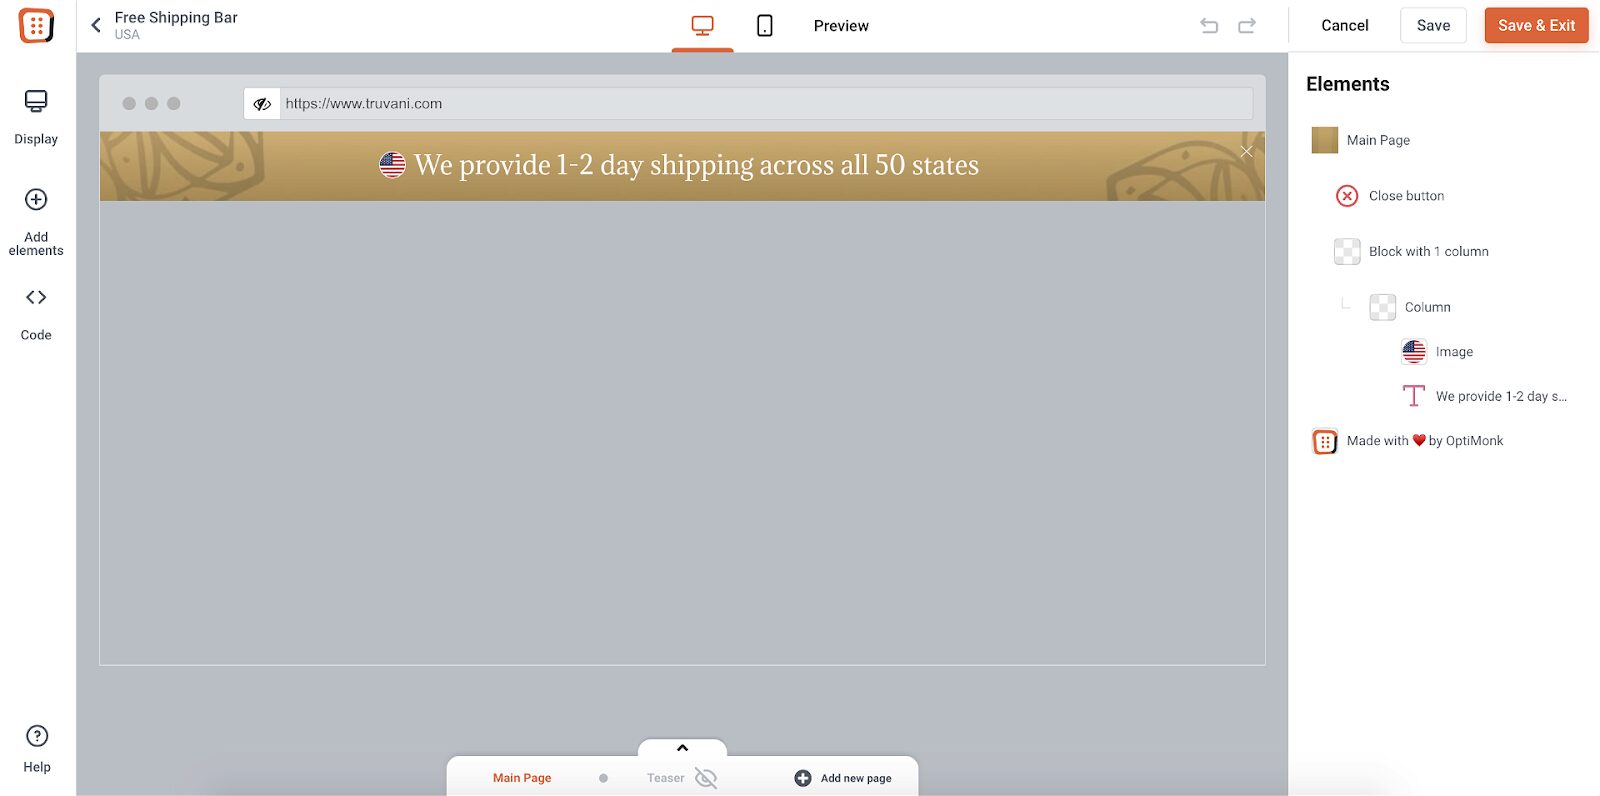
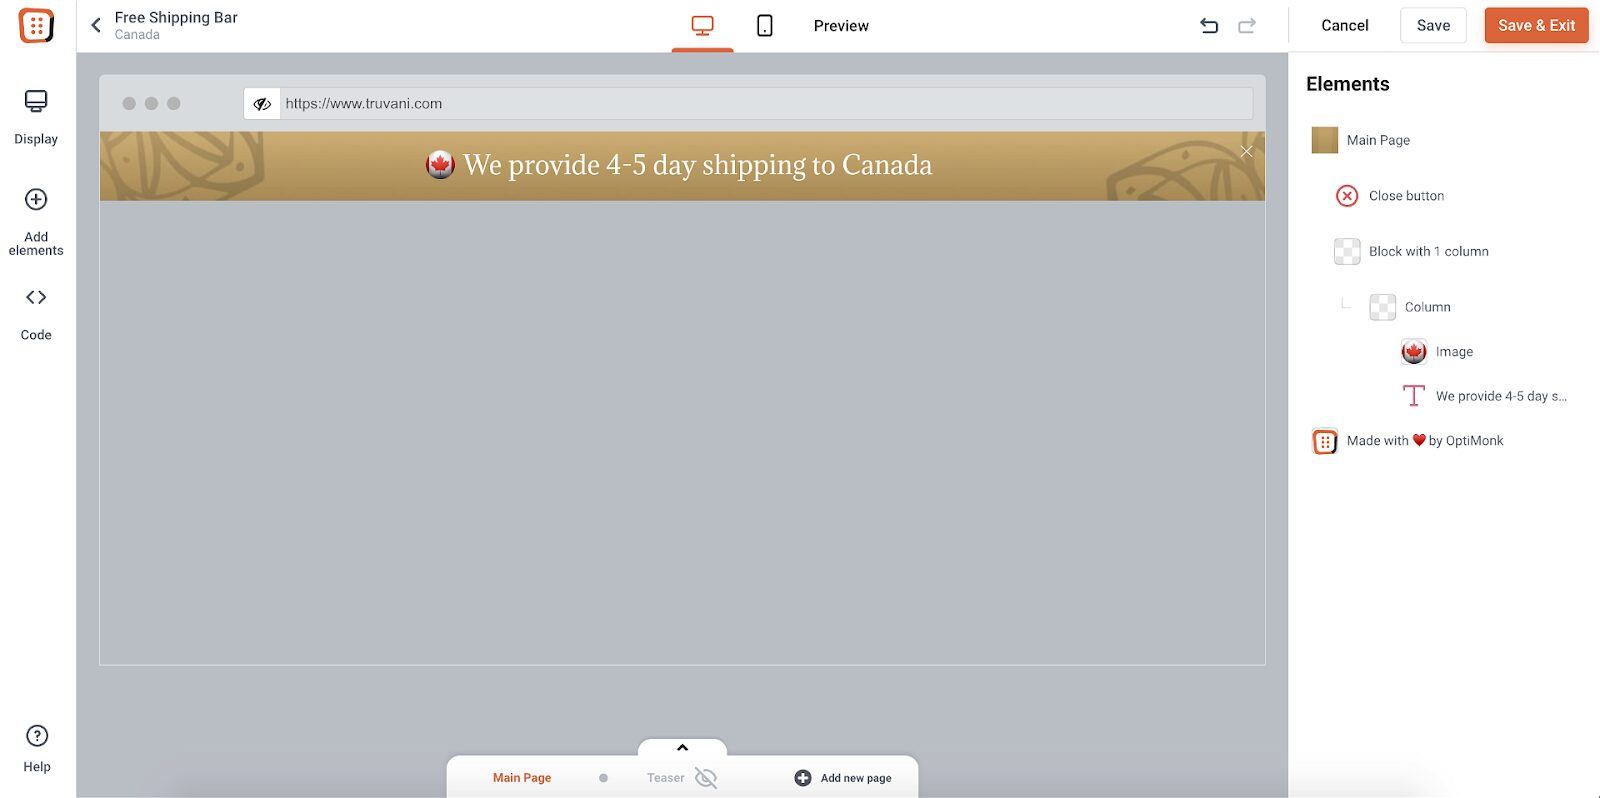
Customize each version by adding things like the country’s name and flag. And don’t forget to update the shipping info to match what applies for each country.
For example, if someone’s from the USA, they’ll see shipping details that make sense for them:
And this one is for visitors from Canada:
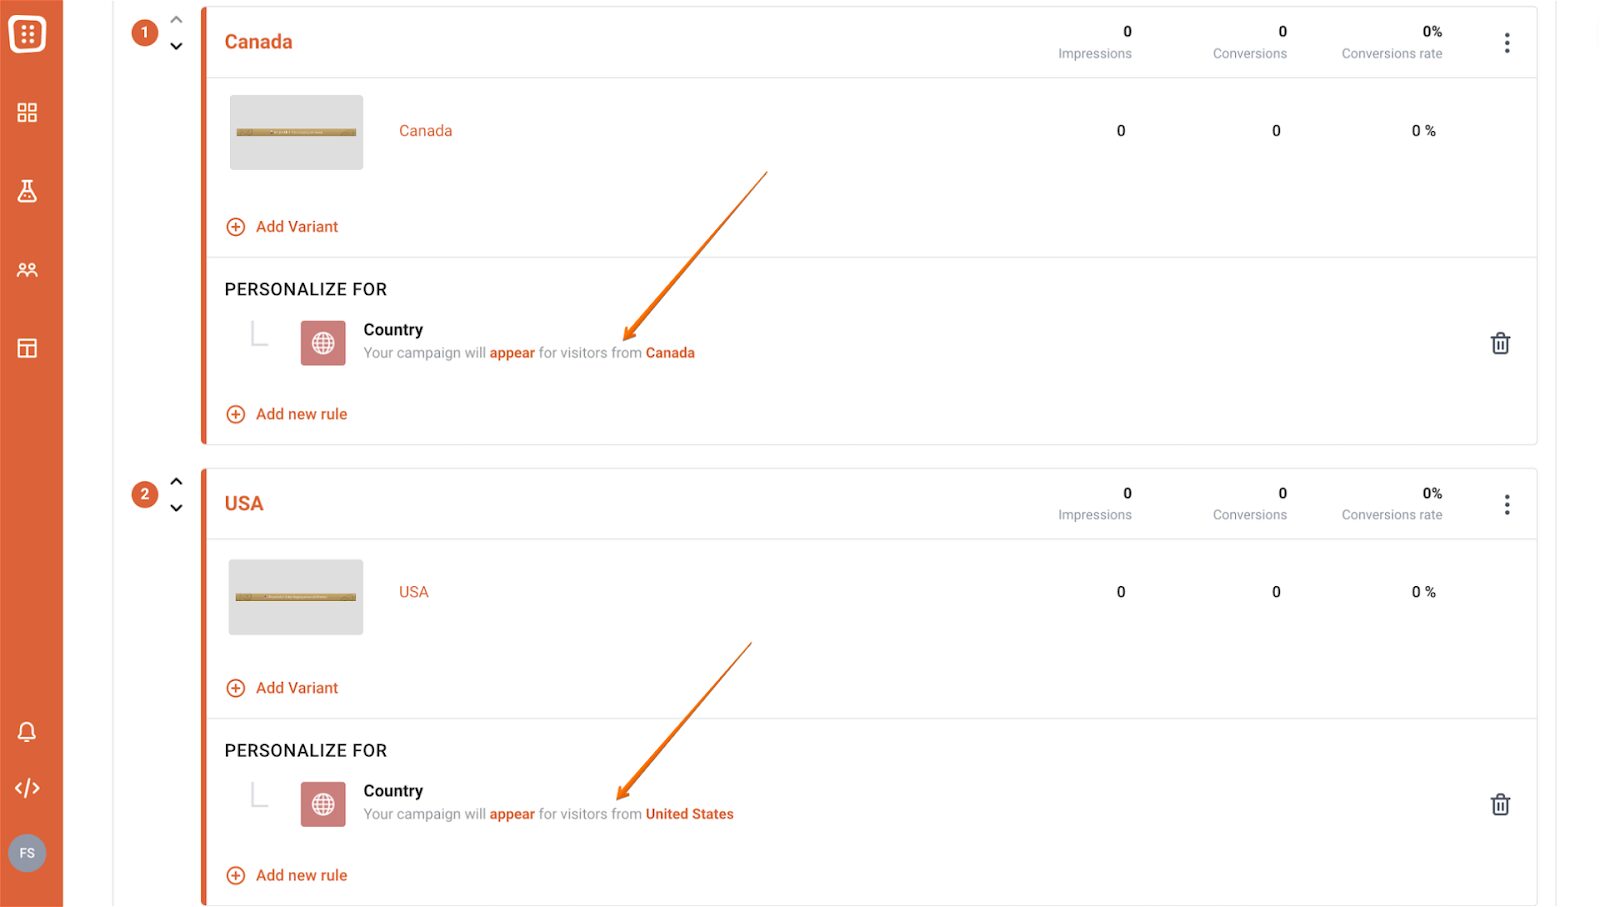
Step 4: Add new rules to your experience variants.
Use Country-Based Targeting to show the different variants to your user segments.
If you want to learn more about Country-Based Targeting, click here.
Step 5: Launch your campaign.
Once everything’s set up just the way you want, it’s time to make your shipping bar live.
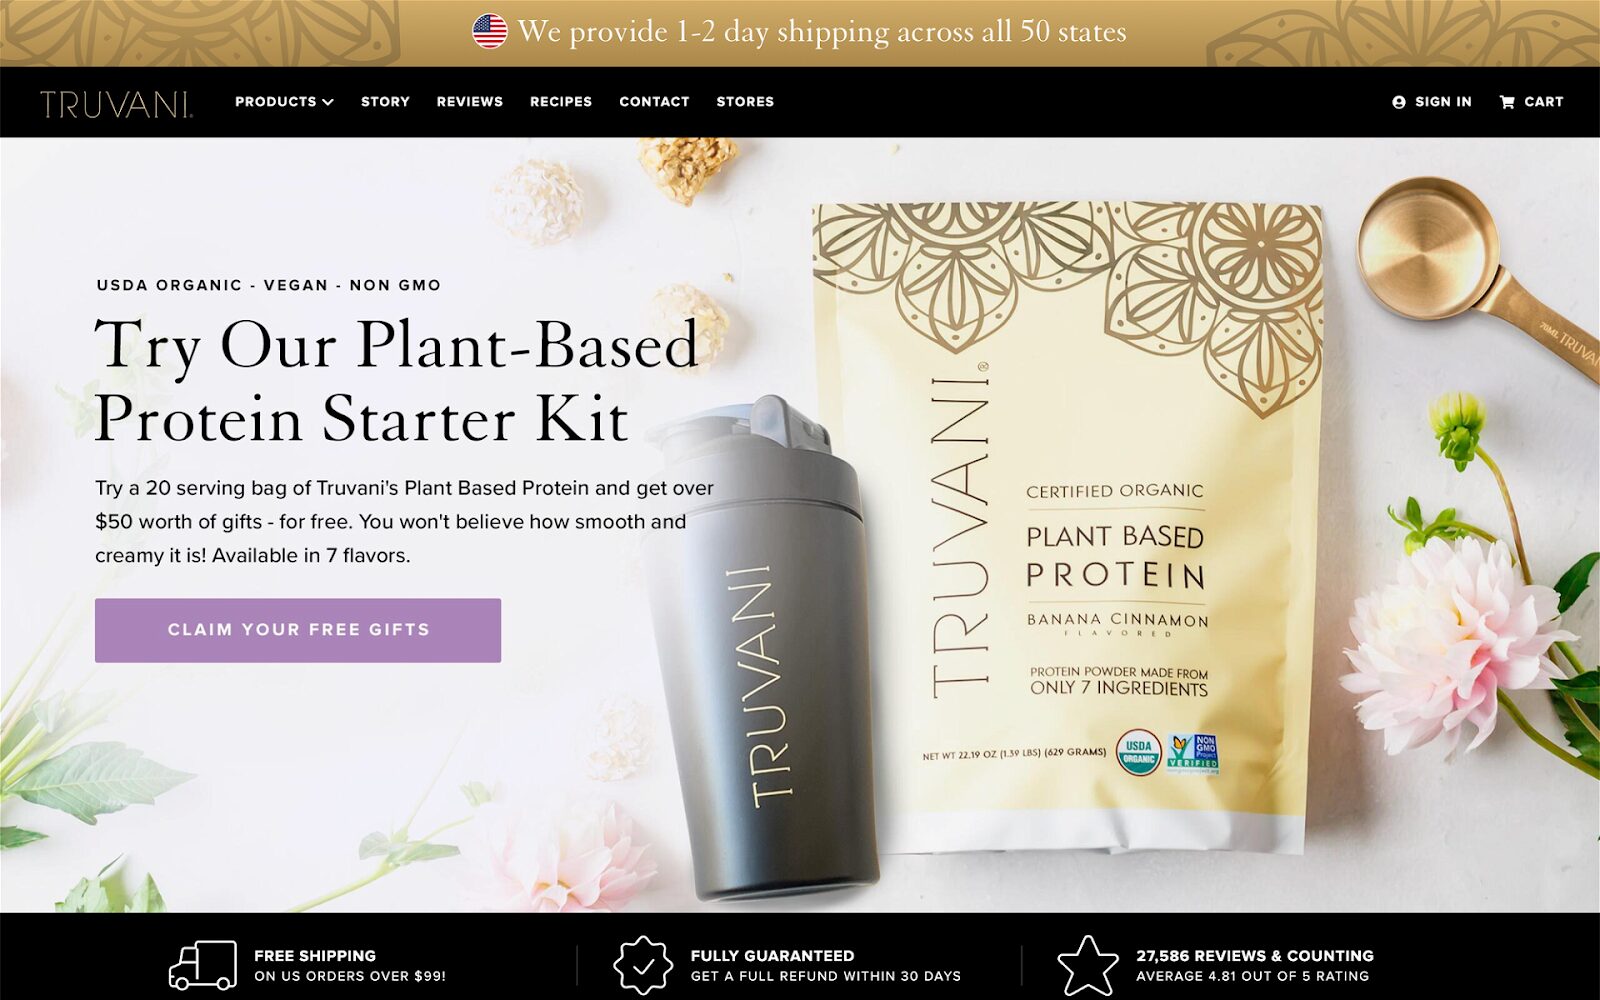
Now, when people visit your site from different countries, they’ll see shipping info tailored just for them.
This is what it will look like for visitors from the USA:
Wrapping up
With the rise of online shopping, customers increasingly expect free shipping as a standard offering. Shopify store owners can find themselves in a difficult situation if they ignore the power of free shipping.
By leveraging tools like OptiMonk, you can easily enhance your free shipping promotion strategy and maximize its effectiveness.
OptiMonk provides intuitive features and customizable templates that allow you to create eye-catching popups, sticky bars, and sidemessages to promote your free shipping offer.
Offer free shipping in a smart way, and watch your conversion rates soar!


