- Blog
- 7 Tried and True List-Building Strategies That Work in 2025
7 Tried and True List-Building Strategies That Work in 2025
-
Nikolett Lorincz
- Marketing
- 6 min read
Table of Contents
Email marketing has been around for just about as long as ecommerce itself. There’s a reason for that: communicating with email subscribers directly is an opportunity that online businesses need to be taking advantage of.
What’s unique about email marketing is the level of control that an ecommerce website is able to have over their campaigns. When it comes to other social media channels, an ecommerce business is always relying on a third-party platform to get their message out there. While that’s useful, the problem is that a company like Facebook can easily change their ad policies, ban accounts that are following you, or even go out of business.
Indeed, the chaos of Twitter since Elon Musk’s takeover is a perfect example of why you need to build owned media rather than relying on third parties to connect with your target audience.
In this article, we’ll explore the most advanced ways to collect email addresses and build a strong list of email subscribers.
Let’s get started!
Why is having a list-building strategy so important?
As mentioned, you never want to be totally reliant on social media platforms in order to communicate with your customers.
But email marketing also carries many benefits in addition to ownership. Most importantly, email marketing campaigns that reach potential customers are the most direct line of communication for turning leads into sales.
Even though email marketing can seem “old fashioned,” statistics show that it remains an incredibly effective way of achieving revenue growth.
Here are some specific numbers that can offer some motivation for your email marketing efforts:
- Email marketing revenue is estimated to reach almost 11 billion by the end of 2023.
- 50% of people buy from marketing emails at least once per month.
- 59% of respondents say that marketing emails have influenced their purchases.
Additionally, many internet marketing experts agree that email marketing has an important role to play in any marketing strategy.
“Out of all the channels I tested as a marketer, email continually outperforms most of them,” said Neil Patel recently. “Not only does it have a high conversion rate, but as you build up your list you can continually monetize it by pitching multiple products. Just look at ecommerce sites like Amazon, one way they get you to continually buy more products from them is by emailing you offers on a regular basis.”
Joe Pulizzi agreed, saying: “So many brands and companies build their audiences on Facebook and Google+, which is fine, but we don’t own those names – Facebook and Google do. If we are thinking like real media companies, the asset is in the audience. Getting an email address is the first critical step to figuring out who my reader is, and hopefully in the future, my customer of some sort.”
What’s the best way to get more email subscribers quickly?
It’s difficult to build an email list from scratch or to quickly scale up an email marketing operation.
That’s because the traditional list-building email opt-in forms tend to have low conversion rates. People need to see a direct benefit in order to go through the trouble of filling out a signup form.
And worst of all, if you push your generic sign-up form using popups, you’ll likely annoy your website visitors.
Fortunately, a personalized list-building strategy has the potential to both grow your list quickly and provide an improved customer experience. Shoppers expect a personalized shopping experience that’s tailored to their needs. The last thing they want is to see the same generic messages over and over again.
When you take advantage of all the data you have about your target audience, you’ll be able to capture email addresses by appealing to the needs and interests of your visitors.
Using personalized calls to action will help you significantly increase the conversion rates of your list-building opt-in forms.
7 list-building strategies you can use for your ecommerce store
There are lots of ways you can use personalization to help you create high-converting lead generation campaigns and gain more email signups.
Some of the strategies we’ll cover are appropriate for collecting email addresses from customers at different stages of the customer journey (or with different levels of buying intent). You always want to use the most appropriate lead generation campaign for each of your website visitors.
That said, let’s take a look at each strategy in detail.
1. Promote relevant lead magnets for blog visitors
Visitors who are at the beginning of the sales funnel usually don’t want to see discounts, since they’re not really thinking about making a purchase yet. Rather, they’re still learning about all the possible solutions to their problem and exploring their options.
Therefore, you should offer them valuable content as an incentive for completing an opt-in form instead of pushing a discount too early.
Offering a free ebook in exchange for email sign-ups (particularly one that’s on the same topic as the content they’ve just read about in a blog post) is a great idea for these early-stage visitors.
Exclusive content usually operates as a great lead magnet because people get the sense that they won’t be able to get that content anywhere else. That makes it an excellent incentive for filling out an email signup form.
You can promote lead magnets like these using exit-intent popups based on templates from OptiMonk:
Or you can embed a lead magnet into your article:
2. Tease your seasonal campaigns
Whenever you’re running a special promotion like a seasonal sale, you’re going to want people to know about it. So why not use those promotional messages as an opportunity to build your list?
Not only will you collect email addresses, but you’ll also build a sense of anticipation for your upcoming event.
This list-building strategy is perfect for new visitors who’ve spent some time browsing through your category and product pages but haven’t added anything to their cart. They’ve shown that they’re interested in your products, but haven’t found the right deal for them.
A big sale could change that, though, which is why you’ll generate a lot of new subscribers using this strategy.
Check out these seasonally appropriate templates that can help with promoting a sale and lead generation at the same time:
3. Build your email & SMS lists at the same time
What if you’re not just interested in sending your customers email campaigns, but also want to branch out into SMS communication?
The “Trojan Horse” lead generation strategy is the most efficient way to collect both a visitor’s email address and phone number.
To pull this tactic off, you’ll need a great offer that very few people will be able to refuse and you’ll have to be clever with how you reveal this offer. There are a few steps to go through here.
First, you’ll need to offer a discount in exchange for email signups. Usually, this discount is around 5 or 10% off. You can even offer a “mystery discount,” like in the example below:
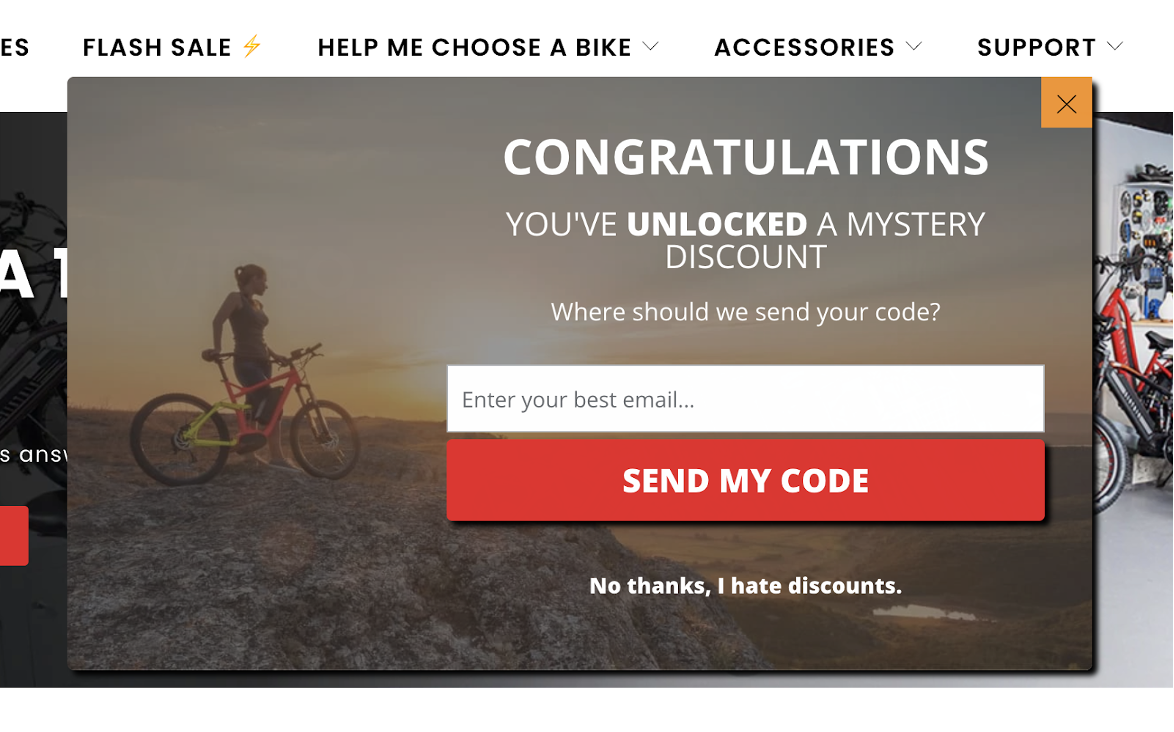
It’s a good sign when a customer completes the first opt-in form, which is why you shouldn’t stop there. Instead, you can then offer an additional discount in exchange for your new subscribers also signing up for SMS marketing messages.
In the next stage of the example we’re looking at, the online business offered “double” the initial discount in exchange for the user’s phone number.
Here’s what it looks like:
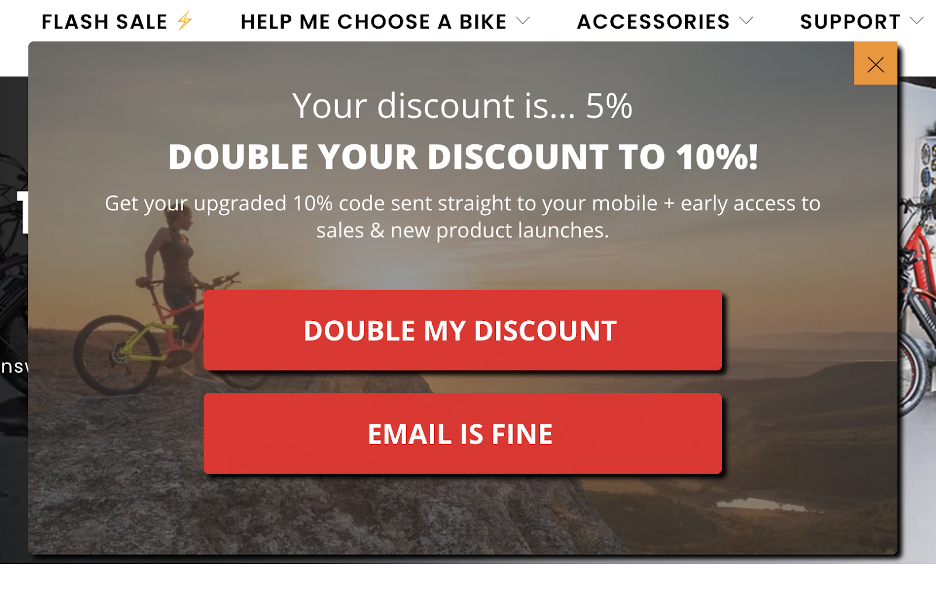
When you have a strong CTA like “double my discount,” most people will be more than happy to save even more money.
Here’s what the third page of this lead generation campaign looks like, where visitors can enter their phone numbers.
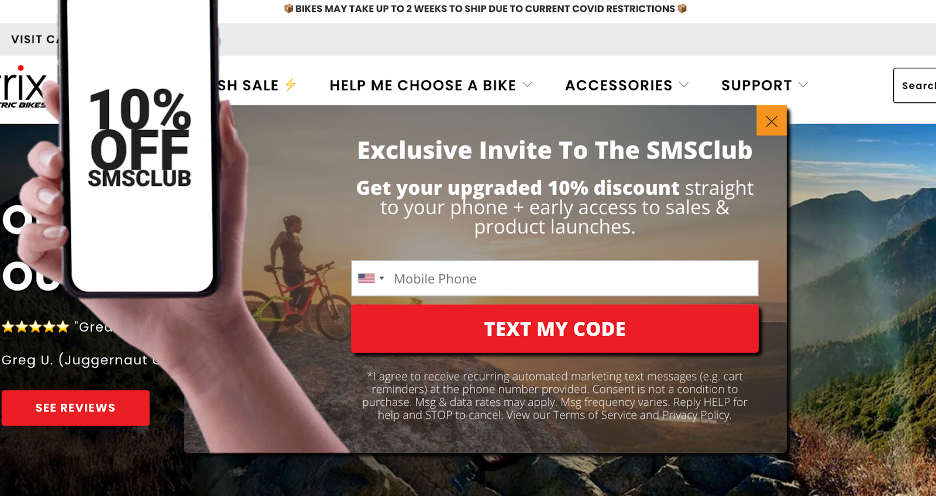
This campaign, which was created by a D2C business called Biktrix, resulted in over 2600 new subscribers for their SMS list. Even better, they earned an average of $109.39 for every SMS subscriber they were able to convert.
Here are some templates that could help you gain new customers with a signup form like the one Biktrix used:
4. Get to know your visitors better and provide relevant recommendations
A survey (also known as quiz funnel) signup form is a lead generation tactic that helps you gather more information about your customers’ needs and interests. And of course, that data can be put to great use further down the funnel.
Building your list by asking your visitors a helpful question makes them feel like you’re speaking to them on a personal level, rather than treating them the same as everyone else. Using this marketing strategy, you’re welcoming them before requesting their contact details, which actually turns out to be a great way to build an email list from scratch!
You can ask your customers a question about what they’re interested in shopping for on your site. This allows you to recommend relevant products based on their answer.
Here’s an example of what that can look like:
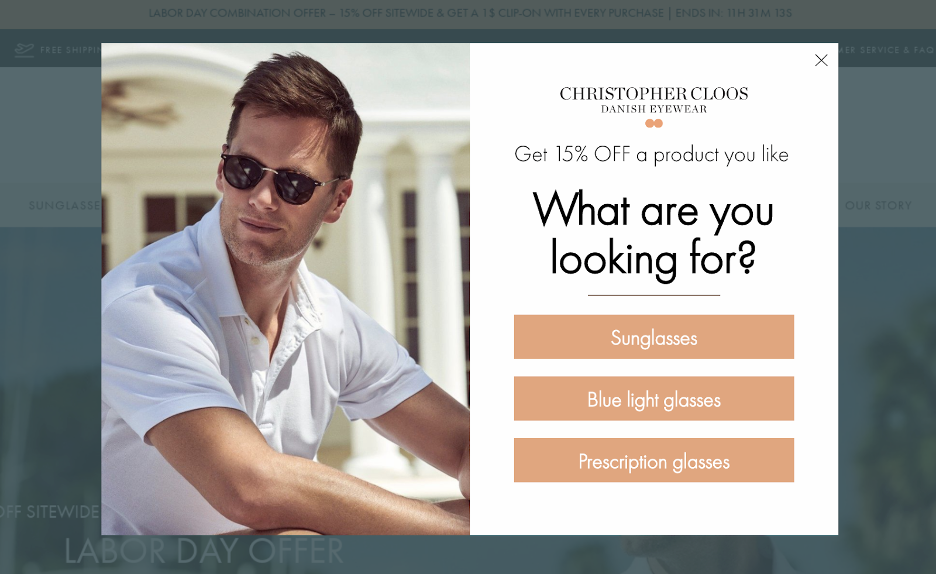
Only after a customer has interacted with the first stage of the campaign do you show them an email signup form, like below.
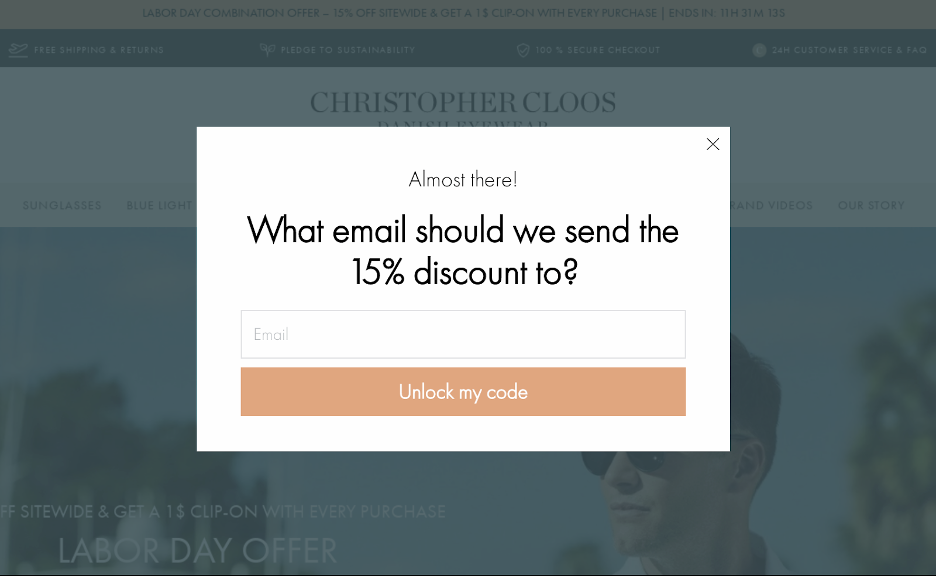
Finally, you can recommend products that they expressed interest in. This helps kickstart your customer’s shopping experience and gives them the chance to see products they’re really interested in.
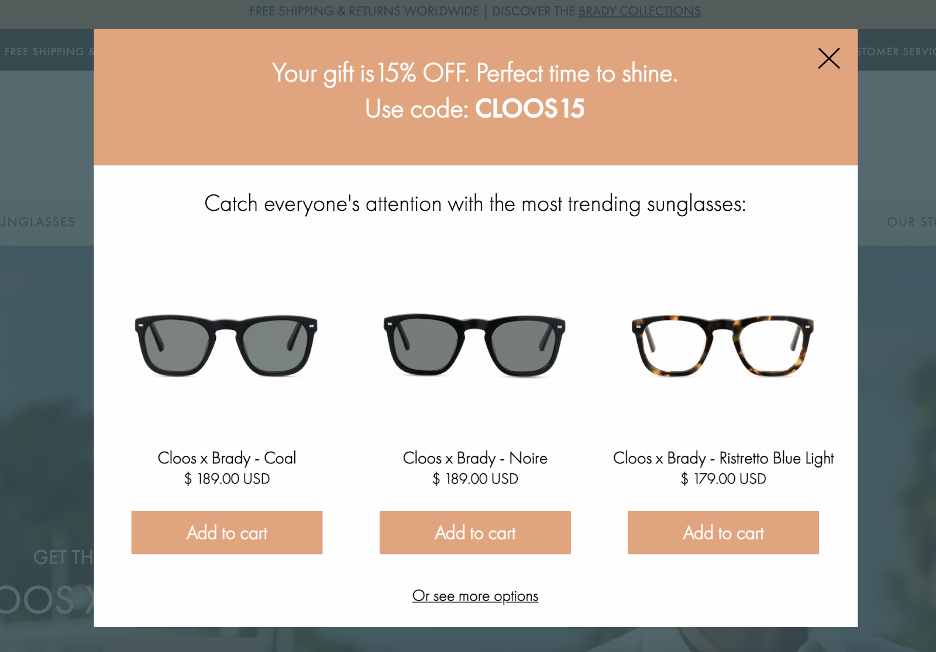
You can get started using this type of opt-in form on any of your landing pages or blog posts with these templates:
5. Let your visitors play & win
If you’re looking for ways to make your website experience more fun and engaging, we’d recommend giving gamification a try. Users get more excited about your offer when they have a chance to win a discount rather than just getting handed one.
And our internal statistics show that gamified popups convert at a far higher rate than classic email popups: 13.23% (!) vs. 5.10%.
Check out some great gamified list-building templates like lucky wheels, scratchcards, and pick a gift popups below. You can really step up your email signups with one of these fun opt-in forms.
6. Break your list-building popup into multiple steps
As we’ve seen with some of the other list-building strategies, asking for a visitor’s email address right away isn’t always the smartest strategy. Often, your opt-in forms will get closed as soon as they appear.
So what can you do instead? Try placing opt-in forms partway through a multi-step popup.
On the first screen of a multi-step popup, you can just gauge interest in your email campaigns with a simple question, like “Are you interested in getting email marketing messages from us?” and a simple “YES/NO” answer.
The fact that you’re letting visitors choose whether to see the sign-up form makes it more likely that those who choose “YES” will actually complete the sign-up form.
Try out one of these templates:
7. Embed newsletter subscription forms into your blog
One way to take advantage of your content marketing for list-building purposes is by embedding email signup forms into each blog post you publish.
You can even increase the effectiveness of this tactic by personalizing each CTA based on the topic of the blog post the visitor is reading.
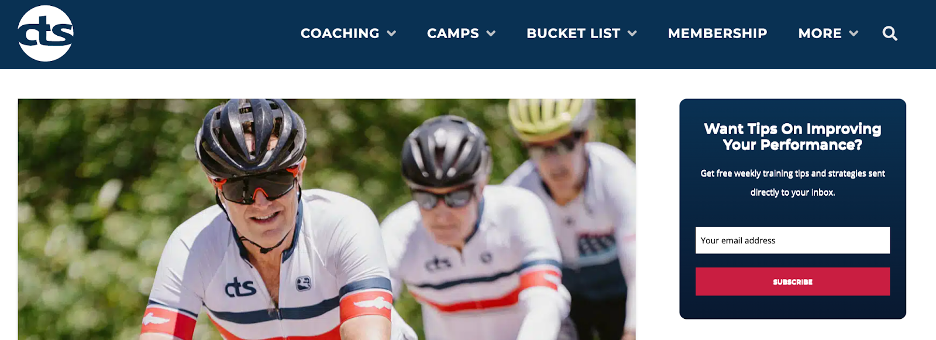
Train Right uses embedded list-building signup forms across their blog and their entire website. As you can see in the example below, they build their email list by placing lead generation forms with a sidebar.
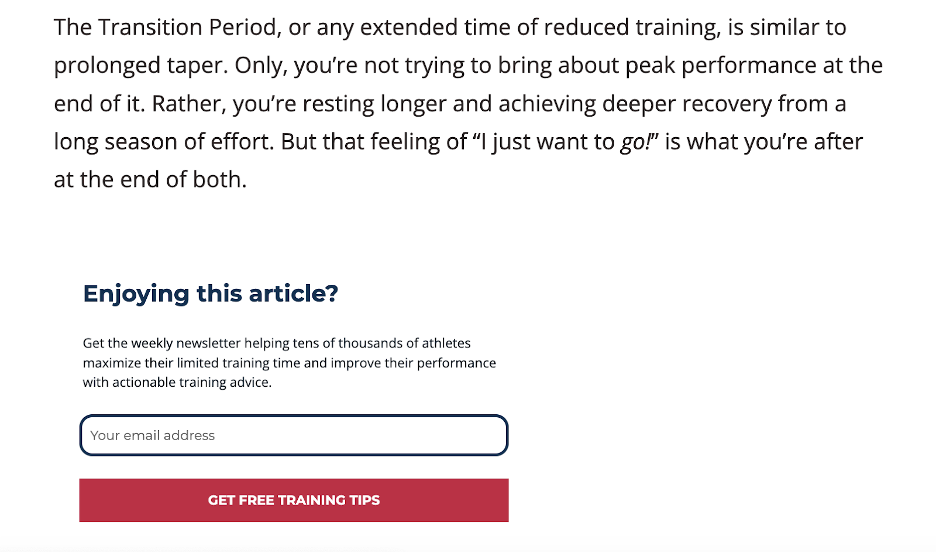
However, they also embed forms into their blog articles to capture new subscribers:
If you want to launch a similar campaign to the example above, you can get started with one of these templates:
What software should you use for list building?
OptiMonk is a great choice whether you need to build an email list from scratch or you want to level up your current email marketing operation.
Using OptiMonk’s popup software, you can automatically pull in new subscribers by placing high-converting lead generation forms on your most visited pages. This is ideal for businesses that need to build an email list fast.
OptiMonk has pre-made templates that allow you to implement any of the strategies we’ve covered in this article. However, it also allows you to improve your website’s performance in many other ways, like saving cart abandoners, upselling and cross-selling products, and collecting feedback.
Best of all, you can get started for free!
Wrapping up
No matter how popular social media marketing has become over the past few years, there will always be an important place for email marketing in ecommerce.
Before you can run successful email marketing campaigns, you need to build an email list filled with people who are interested in your products or services. In this article, we’ve shared some of the most effective list-building strategies out there.
If you choose OptiMonk to implement these strategies, you’ll have a constant stream of new subscribers flowing into your email marketing software!
If you’re interested in more list building strategies, this video has you covered:
Migration has never been easier
We made switching a no-brainer with our free, white-glove onboarding service so you can get started in the blink of an eye.
What should you do next?
Thanks for reading till the end. Here are 4 ways we can help you grow your business:
Boost conversions with proven use cases
Explore our Use Case Library, filled with actionable personalization examples and step-by-step guides to unlock your website's full potential. Check out Use Case Library
Create a free OptiMonk account
Create a free OptiMonk account and easily get started with popups and conversion rate optimization. Get OptiMonk free
Get advice from a CRO expert
Schedule a personalized discovery call with one of our experts to explore how OptiMonk can help you grow your business. Book a demo
Join our weekly newsletter
Real CRO insights & marketing tips. No fluff. Straight to your inbox. Subscribe now
Nikolett Lorincz
- Posted in
- Marketing
Partner with us
- © OptiMonk. All rights reserved!
- Terms of Use
- Privacy Policy
- Cookie Policy
Product updates: January Release 2025


